Let’s talk about how to hold the guitar. You might think you already know, but do you? Really? Let’s find out!
First off, let me make some generalizations:
- There is more than one way to hold a guitar. These are guidelines meant to help you form good habits, not rules meant to tell you what you have to do. But also keep in mind that learning something new often feels awkward until you get used to it, so don’t give up if things don’t feel “right” immediately. Try it for a while.
- These guidelines apply to people playing rock, folk, or pop music on an electric or steel-string acoustic guitar. Playing classical/Spanish guitar is a whole different ball o’ wax and requires a nylon-string guitar and a different posture.
Okay so, with that out of the way, let’s get down to it. There are four main areas to focus on:
- Overall guitar/body alignment
- Right arm and right hand position
- How to hold the pick
- Left arm and left hand position
Key Concepts
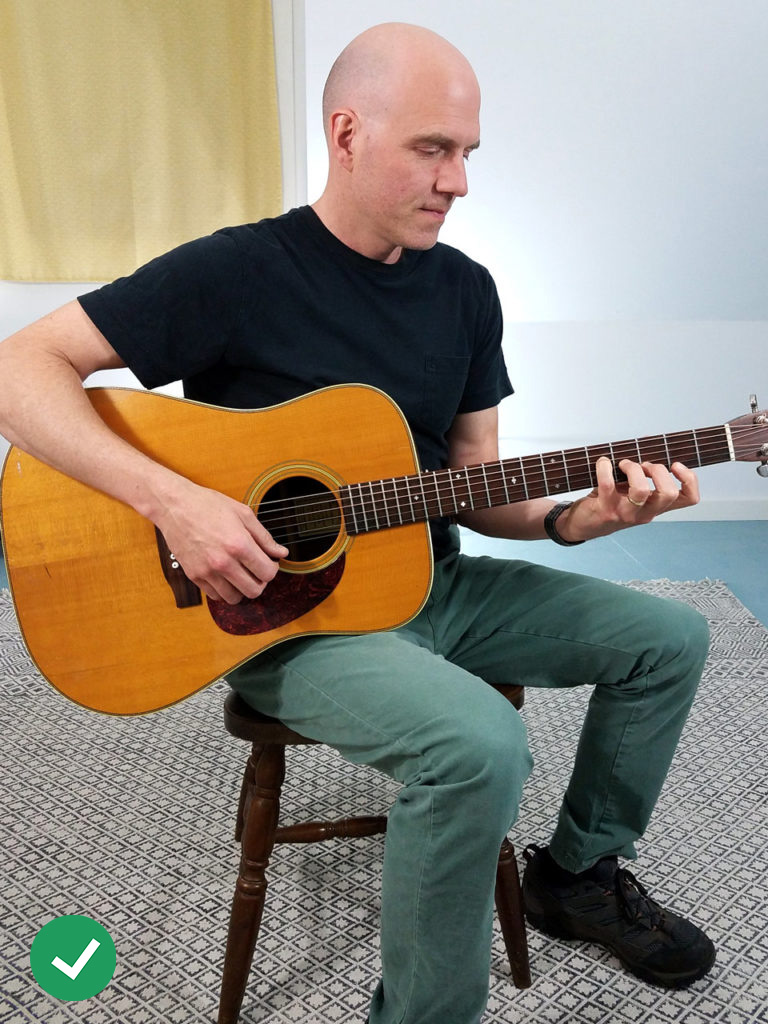
Take a look at this picture, which shows a few important points:
- The guitar is held close to the body and is facing out, not angled up toward the ceiling.
- The guitar rests on the right leg (for a right-handed guitarist)
- The player sits up pretty straight with relaxed (not shrugged or hunched) shoulders
- The right arm rests against the guitar body up around the forearm
- The right wrist is in a neutral position–not flexed or bent
Let’s dig into more detail on some of these points…
1. Overall Guitar/Body Alignment
It’s important to hold the body of the guitar close to your body to allow your hands and arms to get into the correct positions. This includes the bottom of the guitar body, which beginners often let slide away from them a bit so they can see the fingerboard better. You don’t want to do this:
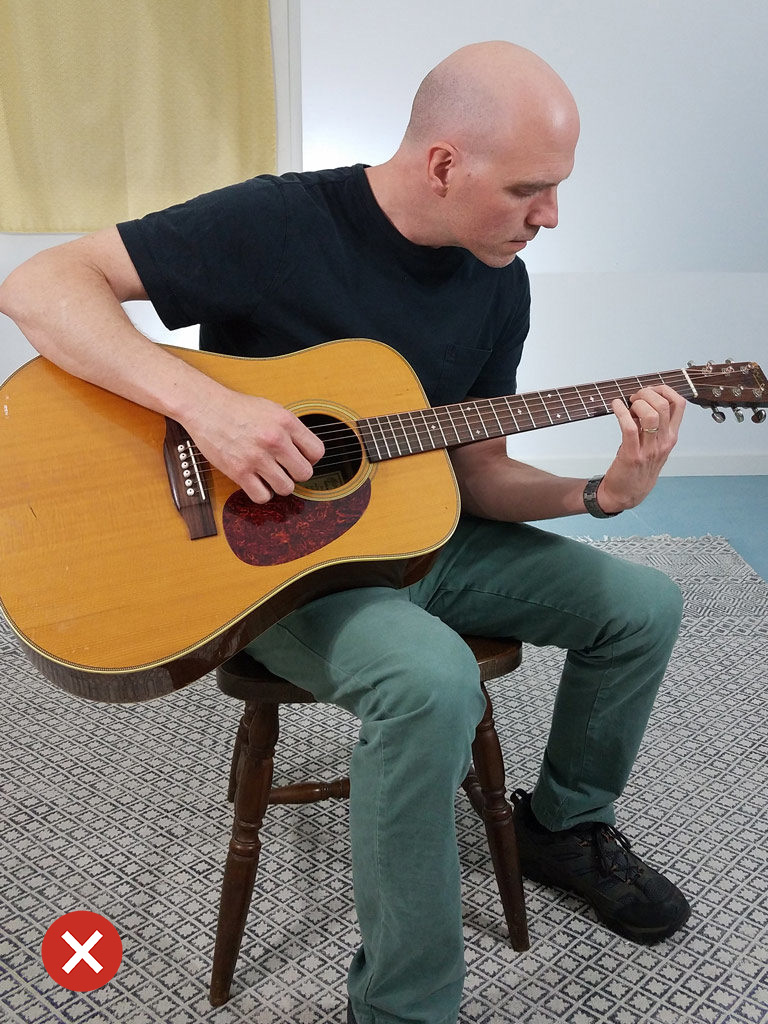
Here, the player has the guitar tilted up toward the ceiling, which puts the left hand in a really awkward position. You’re gonna want to tuck that guitar body in toward you and sit up a little straighter.
2. Right Arm and Right Hand Position
Look at the first picture showing the correct posture again. Notice that the right shoulder is relaxed and that the arm rests naturally on the guitar. The shoulder isn’t shrugged or hunched and the elbow is not out at a weird angle. You want your shoulder and upper arm relaxed but not slumping forward.
As for the lower part of the arm, you’re mostly going to be moving the right wrist and letting the rest of the arm follow along with it. So you want your forearm to be pretty stable and resting near the top edge of the front of the guitar. (Exactly where will vary, depending on whether you’re playing an electric or acoustic.) Now, stable doesn’t mean rigid—you really don’t want either hand or arm to ever be stiff when you’re playing—but it should be supported by the guitar so you don’t have to expend extra energy holding it up. Most of the motion in picking and strumming comes from the wrist, so your hand moves the most, your forearm moves less, and your upper arm just goes along for the ride when necessary.
3. How to Hold the Pick
Holding the guitar pick is a little bit of a balancing act: you want to make sure you hold it tight enough so that it doesn’t pop out of your fingers when you play, but loose enough so it can easily change its angle up or down with the strings as you’re strumming.
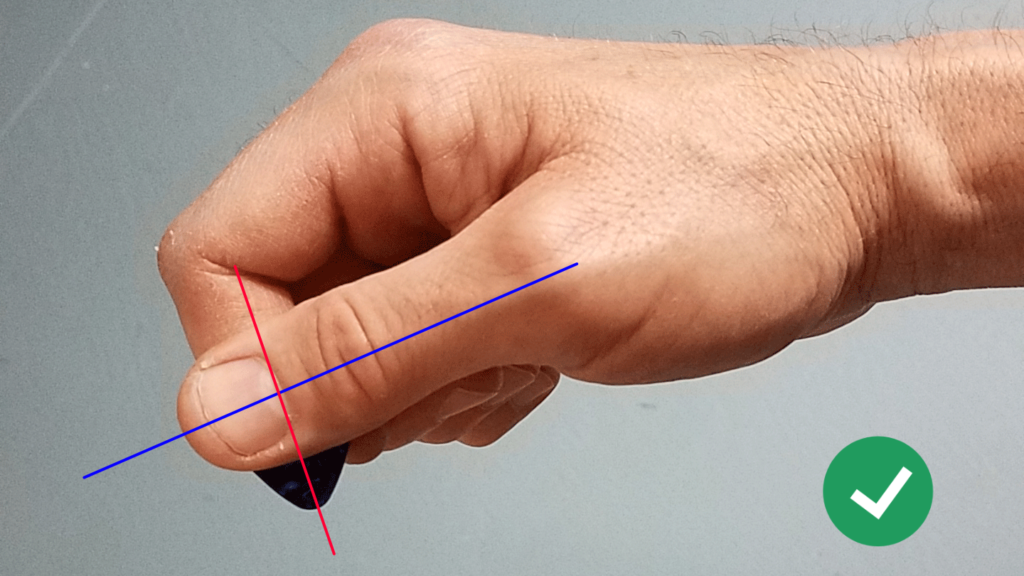
The main thing to keep in mind is that the pick should be held more or less perpendicular to your thumb. In this picture, the pick is being held correctly. If you draw a line that runs through the thumb, and draw another line along the long axis of the pick, you can see how they almost form a 90-degree angle.
Another thing to notice is that the wrist is in a neutral, non-flexed position—the top of the wrist and forearm are pretty much lined up with each other. In this position, the wrist can rotate more naturally, and you’re not creating extra tension in the wrist and forearm. Again, this is a guideline, not a hard-and-fast rule. Your wrist is not going to be locked into a neutral position, and there will be times when it bends and flexes, depending on what you’re doing. But you can think of this as “home base” or the starting position.
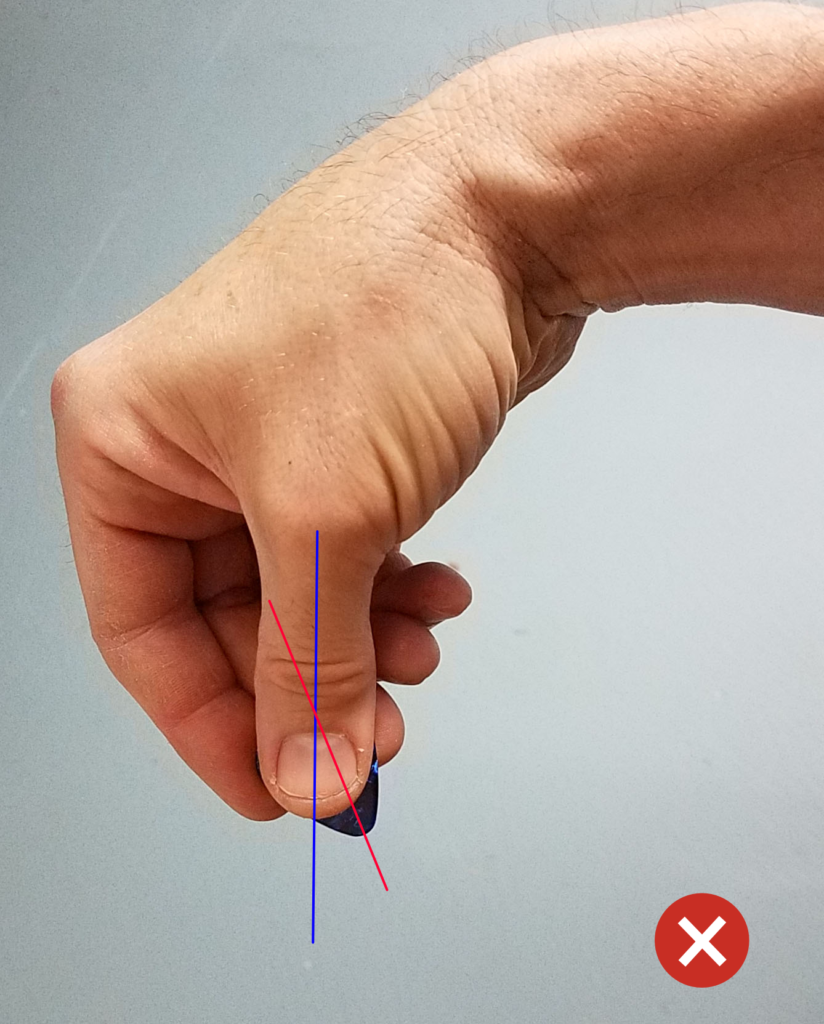
Compare this to the following picture, in which both the pick and the thumb are pointed toward the strings. This makes the wrist bend at an awkward angle, which can cause all sorts of problems with picking and strumming, not to mention a sore wrist. You don’t want to do this.
Left Arm and Hand Position
Now let’s take a look at the position of the left arm and hand. The key principle here is that you want to be in a position that allows your hand to easily reach notes all over the fingerboard. And you want to do it in the most relaxed way you can, with a minimum of tension.
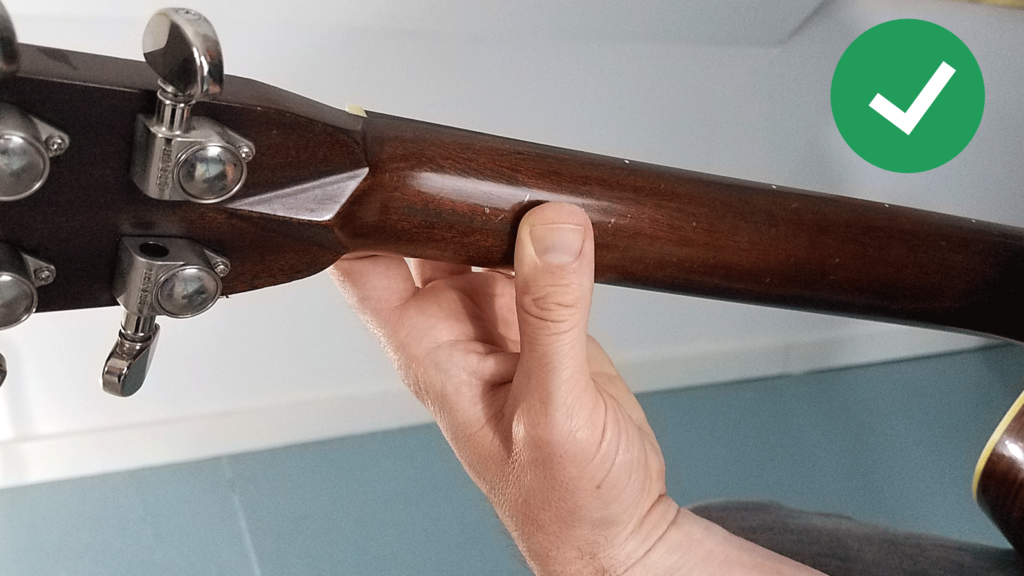
An important habit that you want to get into right away is to keep your thumb behind the neck. It’s so important that I’m going to say it again: keep your thumb behind the neck! This will help you place your fingers correctly on the fretboard and will allow you to reach notes and chords that would otherwise be impossible to reach—or at least unnecessarily hard.
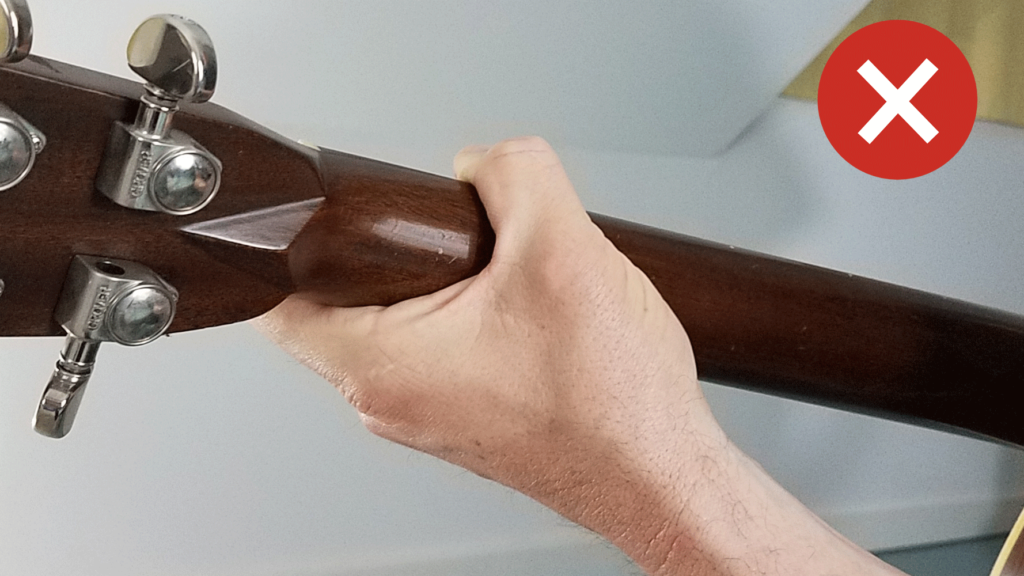
Very common newbie mistakes include wrapping the thumb around the neck like this:
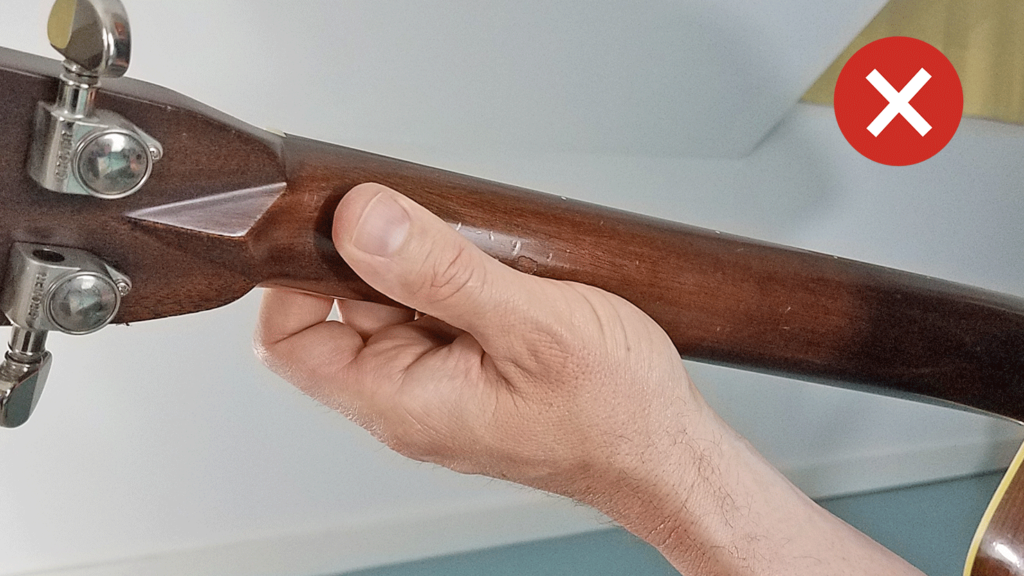
or letting the thumb lie along the neck sort of parallel to it, like this:
Now, just to clarify: it’s totally fine, eventually, to wrap your thumb over the top of the neck. Guitar players (including me) do it all the time. It’s almost a necessity for a lot of rock playing. But you also need to be able to keep your thumb behind the neck and, if you don’t get into the habit when you’re starting out, you probably won’t do it later either. And boy will you regret it. So do yourself a favor and focus on correct thumb position every time you sit down to play. Be a maniac about it. The sooner you drill it into your brain and your muscles, the sooner you’ll be able to forget about it and just play in either position.
Those are the main ideas that should help you start forming good habits. Each time you sit down to play, try to run through a quick little mental checklist, making sure you’re doing the points mentioned above. Eventually, you’ll start getting into the right positions naturally, without thinking. In the early stages, you might say the following cues to yourself as reminders of good form:
- “Guitar body close”
- “Not hunched over”
- “Pick at 90 degrees”
- “Thumb behind neck”
Good luck practicing!