A common (and good) way to start out on the guitar is to first learn the basic open chords. Once you have those chords down, the next step is to learn barre chords.
A barre chord is a chord in which one or more fingers is pressed onto multiple strings on the same fret. (The word “barre” is pronounced “bar” and comes from the French word for, you guessed it, “bar”.) So, for example, you might press your 1st finger down onto the second fret of the 1st, 2nd, and 3rd strings. This is different from other (non-barre) chords, in which each finger only plays one note. Here’s an example of a common barre chord shape that we’ll look at in more detail below:

As you can probably tell, the index finger is laid flat and is pressing down on all six strings, while the other three fingers are playing individual notes.
For most people, barre chords are harder to play than open chords, at least in the beginning. But they’re incredibly important and here’s why: they can be moved all over the neck. This means that, once you learn one barre chord shape, you can then play that same shape on any fret, giving you a whole boatload of additional chords.
For example, once you master the F major chord, you can then play F# major just by moving that same chord shape up one fret. Or you can play A major by playing that shape on the 5th fret, or D# major by playing it on the 11th fret. You get the idea.
Barre Chord Techniques
In this lesson, I’m going to show you the four most important barre chord shapes—the ones that you will use over and over again throughout your playing career. I’ll also talk about some other variations like partial barres and half barres. But the most important thing I want to cover is overall barre chord technique, to help you get you off on the right foot. This is one of those areas where, if you develop bad habits early, and keep practicing them, you can make things much harder on yourself in the long run.
There are four techniques that are really important to focus on when you’re playing barre chords and these are (1) left hand and thumb position, (2) left elbow and arm position, (3) 1st-finger position, and (4) non-barre finger position. Let’s take these one at a time:
1 – Left Hand and Thumb Position
To play a barre chord well, your thumb needs to be behind the neck, somewhat perpendicular to the length of the neck. And you should have the pad of your thumb against the neck, not the tip. Correct thumb position will give you the leverage you need to generate the force of the 1st finger pressing against the fretboard. It will also help you play with the tips of your non-barre fingers.

Notice how this thumb position creates space between the palm of your hand (at the base of your fingers) and the bottom of the guitar fretboard. This space is really important in being able to straighten your index finger fully across the entire neck.
To get the thumb into this position, you need to make sure your arm is positioned correctly as described next.
2 – Left Arm Position
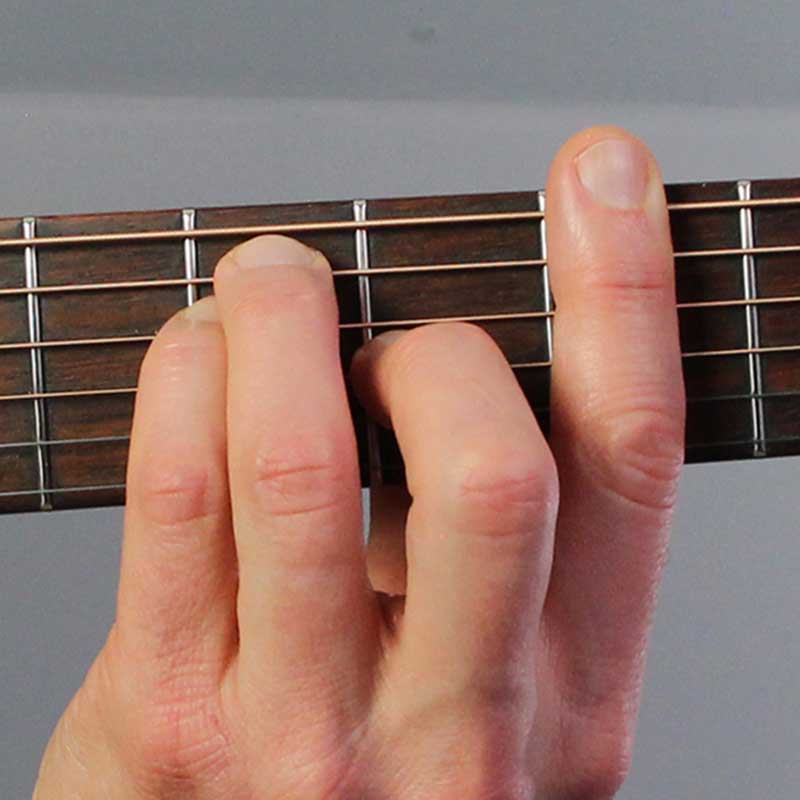
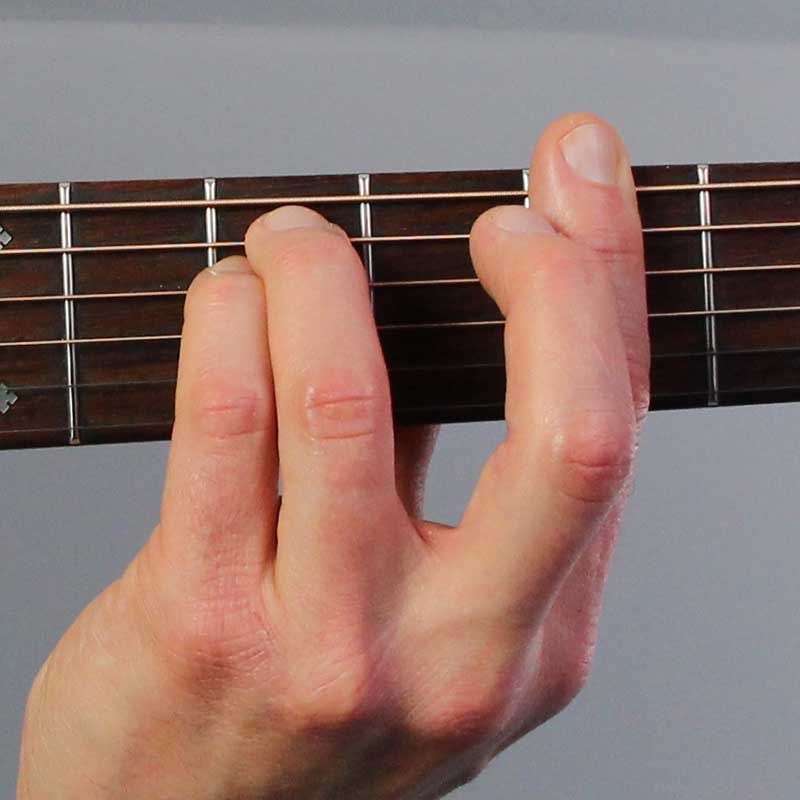
The only way you can really get your hand into the position described above is by raising the height of the guitar relative to your arm. You can do this by raising up the leg that your guitar is resting on (with, say, a book, stool, or the rung of a chair). Or you can slightly drop your left shoulder down and forward a bit, so that your elbow almost points to the ground. You don’t want or need it to point straight down but it should point more toward the floor than toward the wall behind you. The more your elbow points behind you, the more difficult the barre chord will be to play.
Take a look at these two pictures. In the one on the left, the elbow is positioned higher relative to the guitar neck, and there is no space between the palm and the bottom of the neck. In contrast, in the picture on the right, the shoulder is slightly lowered and the elbow points more sharply toward the ground. As a result, there is room between the palm of the hand and the guitar neck. This room is critical to playing full barre chords.

Not a good position for barre chords.

Yes! Better.
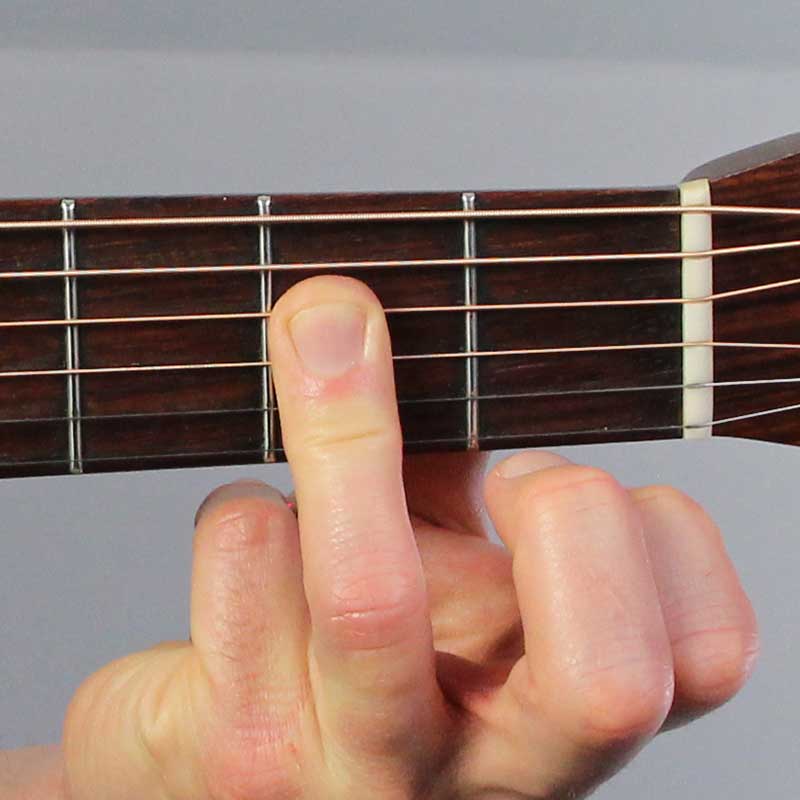
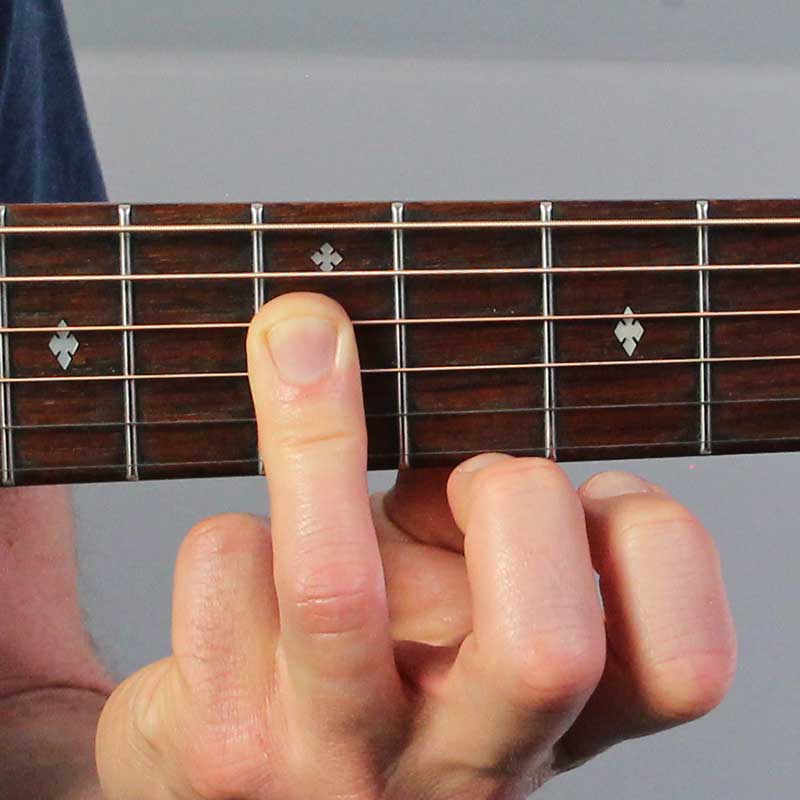
3 – First-Finger Position
The correct positioning of the finger that plays the barre will also require a little experimentation. (This is usually the 1st finger, but can also be different or additional fingers; for example, the B major chord uses a 1st-finger barre and a 3rd-finger barre.) To play the barre, straighten your finger and press it evenly onto the fretboard, right behind the fret. You don’t want to be on top of the fret, but you should be right up against it. To get an even pressure along the whole barre, it can be helpful to focus on pressing down with the middle part of your finger. Otherwise, you might have a good solid barre near the tip of your finger but might not be pressing down enough near the base of your finger.
Sometimes you’ll find that a string sits in the crease between two of the finger segments, making it harder to press the string down. You can try fixing this by repositioning the finger up or down very slightly. In the photo on the right, you can see how the D string (3rd string from the top) is sort of tucked underneath the crease under the knuckle.
Often you just need to press down a little bit harder to make the note sound clear. Over time, after you’ve practiced barre chords for a while, your finger will automatically gravitate to a position that works best for you.

4 – Non-Barre Finger Position
A big challenge in playing barre chords is that the fingers that aren’t playing the barre need to have independence from the barre finger. So even if the barre finger is completely flat, the other fingers need to be able to do their own thing, which sometimes means playing with the tips of the fingers and other times means playing another barre.
So make sure your non-barre fingers use the same proper technique as they would with other chords. For example, if they’re playing individual notes, make sure to play with the tips of the fingers and maintain a proper angle between the finger and the fretboard. Don’t let the fingers approach the fretboard at too shallow of an angle, which runs the risk of getting in the way of other strings/notes. In these two photos, compare the angles of the fingers as they meet the fretboard.
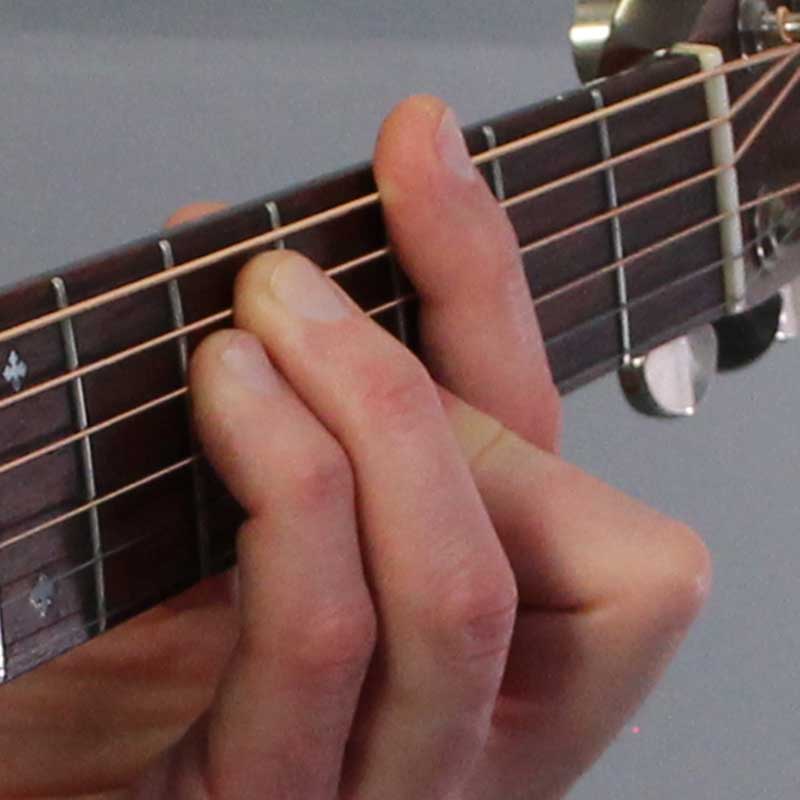
Notice how the pinky is getting in
the way of the string next to it
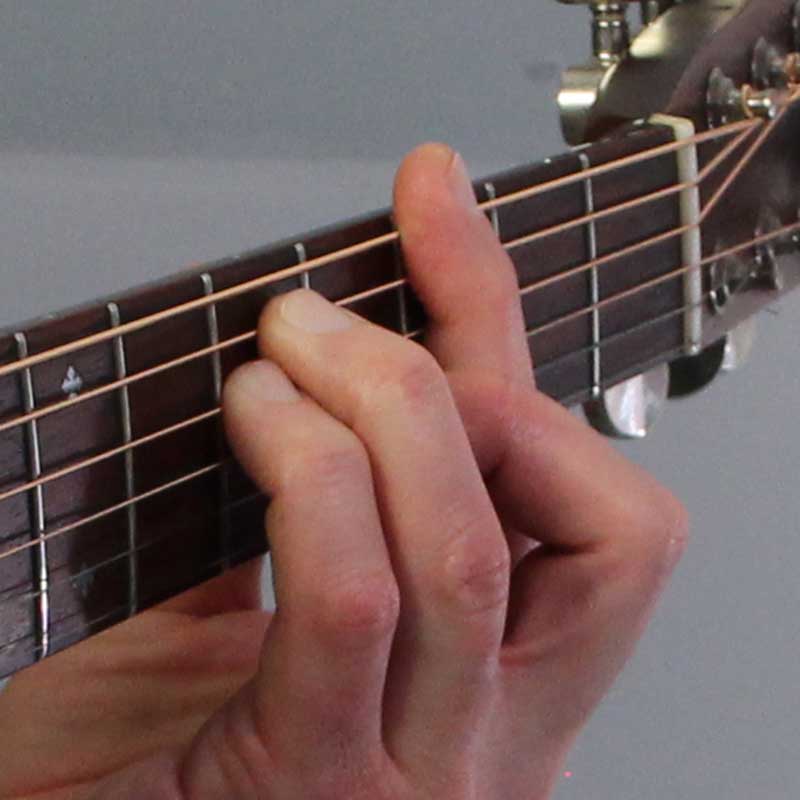
Here, the fingers are curved correctly and
the pinky isn’t touching the G string
To help achieve this finger independence, it sometimes helps to place the barre first, squeeze the neck, and gently “pull” your other fingers into place. This is a hard thing to describe in words but basically I mean use the barre as sort of an anchor that you can subtly push and pull against as you adjust the other fingers into place.
Four Fundamental Barre Chord Shapes
In this section, we’ll review the four most commonly used barre chord shapes. With these four shapes, you’ll be able to play major or minor chords in any key, up and down the guitar neck. And they form the basis for many other barre chord shapes that you’ll use in the future.
These chord shapes fall into two main categories:
- 6-string chords that have a root note on the 6th string
- 5-string chords that have a root note on the 5th string
You’ll see what this means as we get into it.
6-String Barre Chords
As the name implies, these chords use all six strings of the guitar and are very common, all-purpose chords. Because they use all the strings, they tend to give you a loud, full sound.
E-Shape Barre Chord
The “E-Shape” barre chord shape gets its name from the fact that it’s basically an open E major chord that has been moved up the fretboard, with a barre added. Like this:

The sequence of photos below shows how the “E-shape” barre chord is derived from an open E major chord. First, you play an open E major chord but with a different fingering than normal. Instead of using your 1st, 2nd, and 3rd fingers, you use your 2nd, 3rd, and 4th fingers. Then you move that shape up the fretboard to a different fret. Note that the positions of the three fingers relative to each other stay exactly the same.
Finally, you add the 1st finger as a barre across all six strings. The 1st finger basically serves the same purpose as the guitar nut in the open E chord.
(You don’t actually have to go through all these steps when you play the chord; this is just an illustration to show how the chord shape is derived.)

1. E major chord, re-fingered

2. Slide shape up to a different fret

3. Add 1st-finger barre
A chord using this shape gets its name from whatever note is on the 6th string of the fret that you play it on. This is the root note of the chord. So, for example, if you play this shape on the 3rd fret, it’s a G major chord, because the 3rd fret on the 6th string is the note G. You can read more about this chord shape in the lesson on How to Play the F Chord.
E Minor-Shape Barre Chord
This shape is exactly the same as the E-shape barre chord, except that you lift your 2nd finger up off of the 3rd string.

This shape is derived just like the E-shape barre chord shown above: by taking a chord (E minor this time, instead of E major), re-fingering it, moving it to a different fret, and adding a 1st-finger barre. This will give you a minor chord named for the 6th-string note at whatever fret you play it on. So, for example, if you play it on the 1st fret, you’ll get an F minor chord.
The E-minor barre shape can be a little harder to play cleanly because your 1st finger is now responsible for playing notes on three strings: the 6th, 1st, and now 3rd strings (since your 2nd finger is no longer playing on the 3rd string). This note on the 3rd string is usually harder to play well because it’s right in the middle of your 1st finger. It’s not so easy to press down hard on that part of your finger; plus, the joint under your main knuckle often winds up in that spot, which makes it even harder. This is one of the reasons I suggested above that you focus on pressing down with the middle of your finger when making a barre.
However, it’s important that you do get this note to ring out clearly because it’s the note that gives the chord its minor sound. (Specifically, it’s the “minor 3rd” note of the chord, which you can read about in the lesson on triads.)
5-String Barre Chords
These chord shapes use only five strings; the 6th string is not played. (Technically, you can also include the 6th string, but that’s a variation, as you’ll see below.) Like the 6-string barre chords, they tend to have a full sound, but not as full, since the low notes of the 6th string are not included.
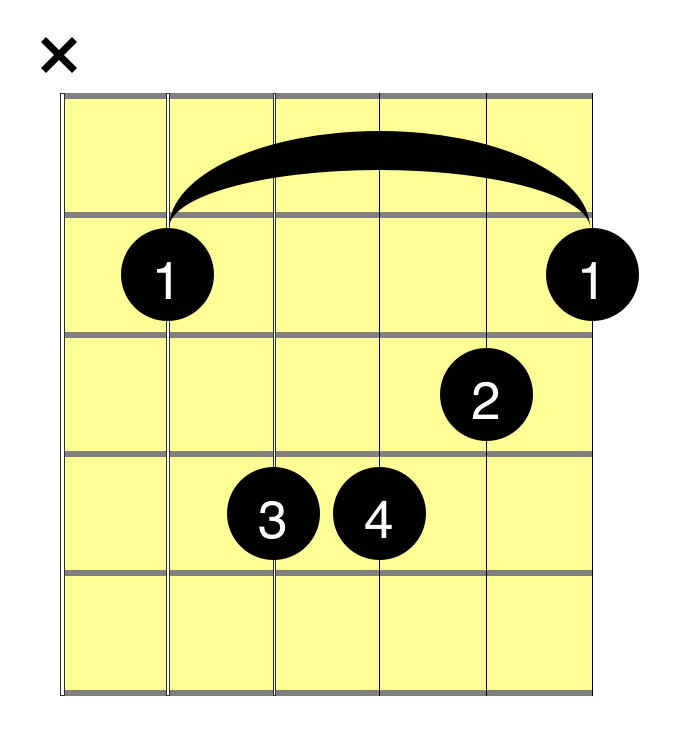
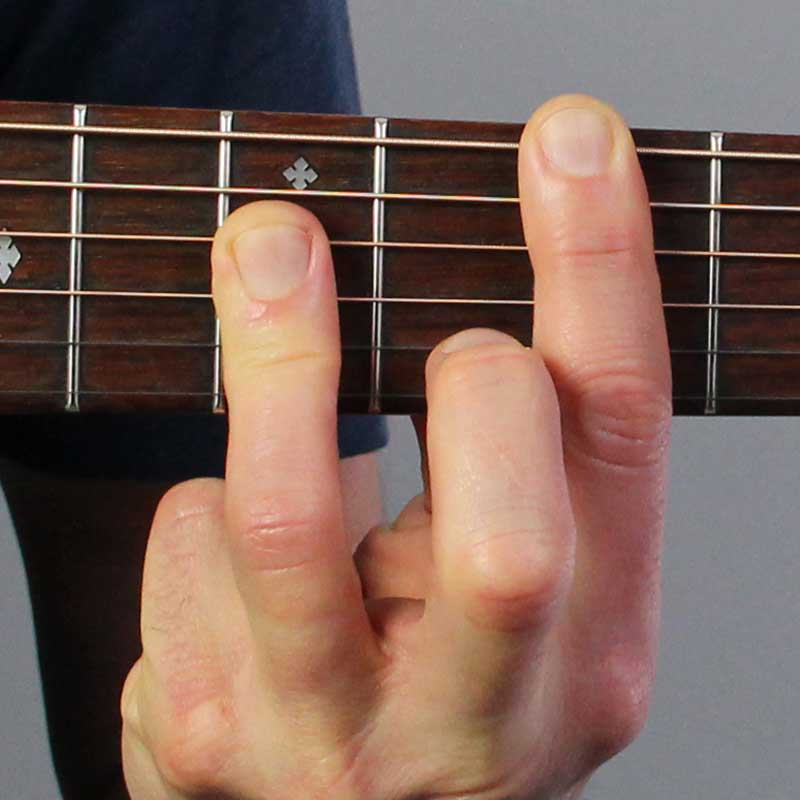
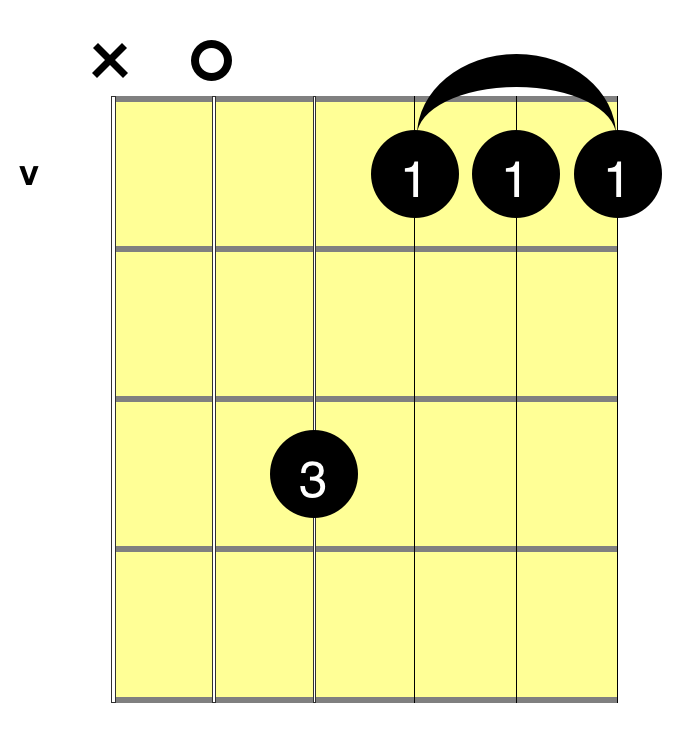
A-Shape Barre Chord
With this chord, you take an open A major chord and play all three notes using a barre with your 3rd finger. Then you slide that shape up to whatever fret you want and play another barre with your 1st finger to cover the open 1st and 5th strings. Check out the lesson on how to play a B major chord for more details about this.
As with the two other shapes we’ve looked at so far, this shape is derived from an open chord (A major) that is moved up the neck, with the 1st finger added as a barre. Here’s the sequence:
1. A major chord, re-fingered
2. Slide shape up to a different fret

3. Add 1st-finger barre
With this chord shape, the name of the chord comes from whatever note is played by your 1st finger on the 5th (A) string. So if you play the chord in 5th position, you’re playing a D major chord, because the 5th fret of the 5th string is D.
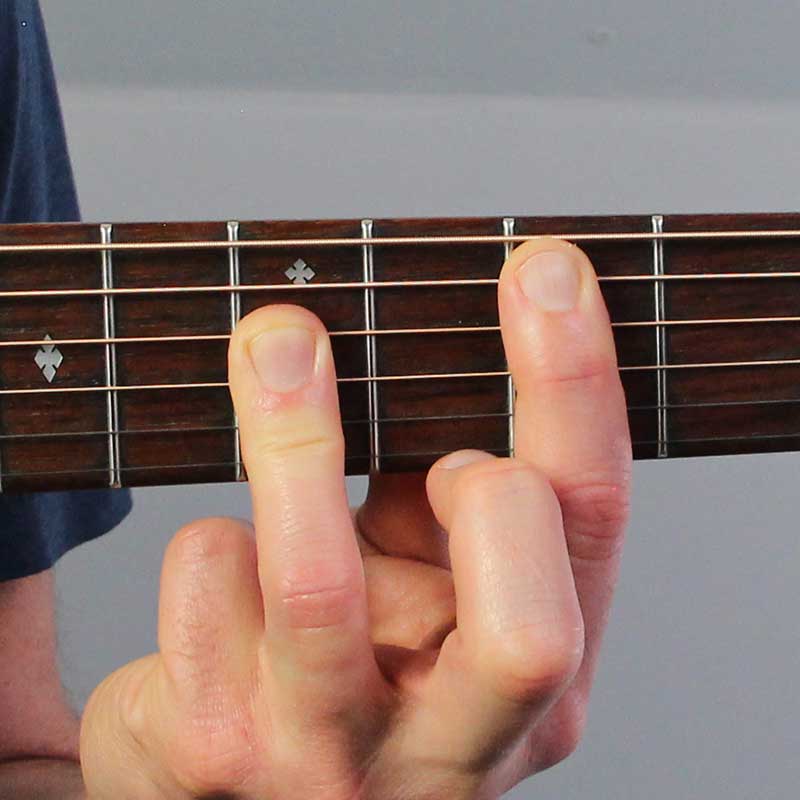
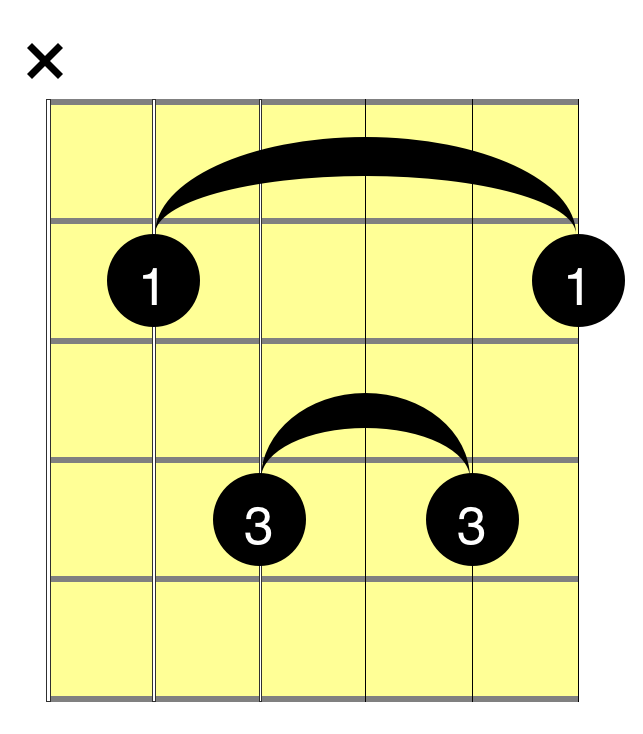
A Minor-Shape Barre Chord
And finally we come to the fourth chord shape that we’ll be looking at in this lesson. This shape is based on an open A minor chord:

It should come as no surprise that the formula for making this chord is the same as the others above: take an open A minor chord and slide it up the neck, and then add the 1st finger as a barre over strings 1 through 5. You can move this shape to any fret, and the name of the chord will be based on the note played by your 1st finger on the 5th string. For example, play it on the 2nd fret and you have a B minor chord.
Adding the 6th String
Usually, when these 5-string barre chords are played, you play the root note as the lowest note of the chord. But sometimes, for a slightly different sound, the chords can be played with the 6th string also. In other words, your 1st finger plays a barre across all six strings and you play all the strings with your right hand, like so:


Doing this adds the chord’s 5th note as the bass note, which has a subtle but very distinctive effect. (See the lesson on chord triads for an explanation of the “root,” “3rd,” and “5th” of a chord.) Try playing these chords with and without the 6th string to get a feel for the difference in sound.
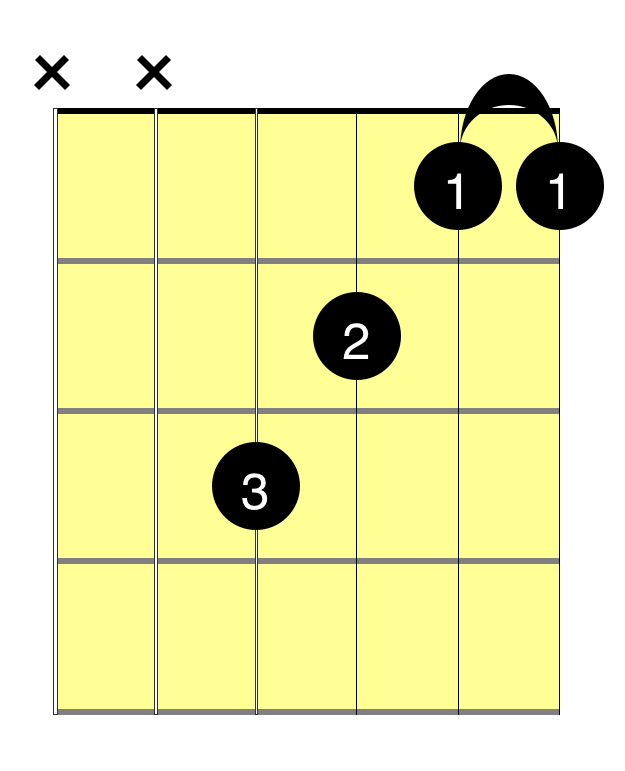
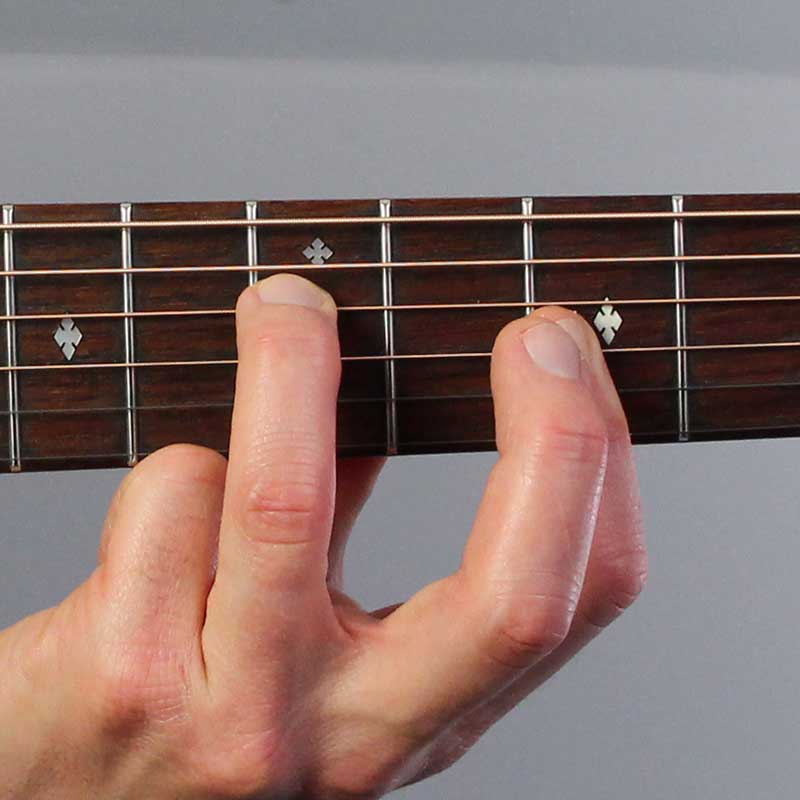
Partial Barre Chords
Some chords only require a barre over 2, 3, or 4 strings. These are called “partial,” “half,” or “small” barre chords. These chords are typically easier to play and are more forgiving if your barre chord technique is not quite spot on. (But you should still try to use the recommended techniques when playing these chords, as it will help your full-barre technique.)
For example, this four-string F major chord is often learned before the full six-string F barre chord. As you can see, only the 1st and 2nd strings are barred by the 1st finger:

And in this A minor chord on the 5th fret, the first finger barres the 1st, 2nd, and 3rd frets, while the 3rd finger plays the 4th string:
When playing these chords, you still want to make sure your thumb is in the correct position behind the neck and that you have plenty of space between your palm and the bottom of the fretboard.
Practicing Barre Chords
Barre chords are tricky to play (at first), but endlessly useful, so it’s worth spending a lot of time getting them right. Because they require a lot of hand strength, it’s important that you don’t spend too long practicing them in any one sitting. Otherwise, you’ll probably wind up frustrated and with an aching hand. Instead, work on them frequently but in short sessions.
But I guarantee whatever time you put into practicing barre chords will be more than worth it because they open up so many possibilities. And when you have the basic chords in this lesson down, you’ll be able to move on to many variations that will expand your musical horizons even further. So get to it!