The A major chord is a workhorse of rock and blues guitar. Because A major is a guitar-friendly key, lots of guitar-based songs are in that key and this chord gets used often. (If you don’t know any chords yet, I suggest you start with the G and Em chords, which I cover here and here, because they’re easier to learn.)
Playing an A Major Chord
As a reminder, when you only say the letter name of a chord, and you don’t specify “major” or “minor”, the chord is assumed to be major. So we’re talking here about the A major chord. There are a couple of different ways of fingering this chord, and I’m going to show you the three most common ways.
In all of the fingerings, the same notes are being played; the only thing that changes is which fingers are being used to press down the fretted notes. Note also that, in each diagram, the A string and the thin E string are both played open, and the low E string is not played. Now technically, since E is one of the notes in an A major chord, you can also play the low E string. However, this puts the 5th note of the chord in the bass, which can sound muddy and is usually not what you want, unless you’re going for that particular effect. Try it both ways and decide for yourself.
A Major – The Classic Way
The first fingering to look at is the one that’s probably the most commonly shown fingering in books and chord diagrams. In my opinion, it’s not the best way to play the chord, but it’s the “classic” fingering and is a good place to start. In this fingering, your 1st, 2nd, and 3rd fingers are placed on the 2nd fret of the D, G, and B strings, in order: 1, 2, 3.
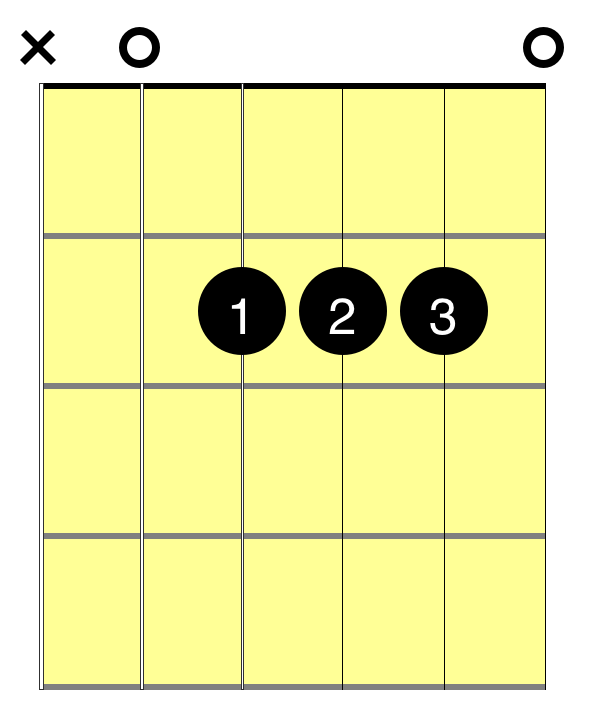

As noted above, the A string and high E string are played open. When you practice the chord, play each note individually and make sure you can hear the note without any strings buzzing or getting muted. This can be tricky business because your fingers are crammed next to each other. This next fingering solves that problem by swapping the positions of two fingers.
A Major – The Better Way
In this fingering, the 1st and 2nd fingers switch places, which allows the 1st finger to tuck in behind the other two fingers. Now we’re getting somewhere!
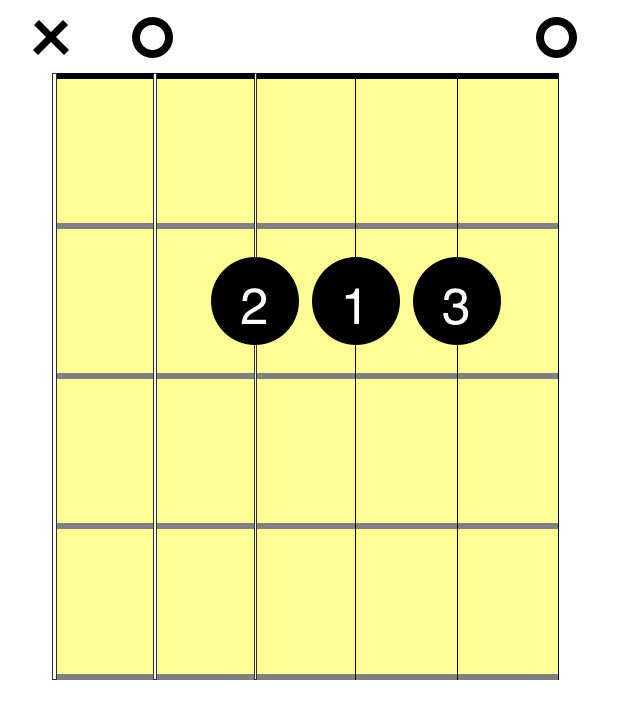

This is the way I always play an A because it feels a lot more comfortable and I’m much less likely to get buzzing or to accidentally mute the open E string. I don’t know if my fingers grew a lot as I got older or what but, at some point in my life, I just started playing it this way and I’ve never looked back. Maybe you have smaller fingers and would rather play the chord the other way—more power to you, brother. Learn both ways and use whichever works best for you.
A Major – Partial Barre
The last fingering I want to take a look at uses a partial barre. In a barre (pronounced “bar”) chord, one finger presses down on multiple strings on the same fret. (Actually, it’s possible to barre notes on two different frets with the same finger, but that’s very rare.) A “partial” barre just means that not all six strings are being barred. You might, for example only barre two or three strings. And that’s what’s happening here:

This is a useful fingering because it frees up your other fingers, allowing them to add stuff on the 3rd, 4th, and 5th frets. One downside is that it’s pretty tricky trying to get the open E string (1st string) to ring out—it tends to get muted by your first finger. With practice, you can get it but, honestly, this fingering is usually used when you don’t really care about hearing that high E and you want to just play the lower notes of the A chord.
This shape is also used for one of the main movable barre chord shapes that you can use to play major chords up and down the neck. In that situation, you would play the barre with your 3rd finger instead of your 1st; more on that in another lesson.
Practice!
As usual, whenever you learn a new chord, you should spend time on (1) making the chord sound good and (2) switching to and from other chords. Play each note in the chord one at a time to make sure you can hear all the notes clearly without any string buzzing. Then practice strumming the chord. And finally, practice switching between this chord and other chords. Go at a steady but slow pace in the beginning and only increase your speed when you can switch chords without pausing.
And don’t forget to practice all three of the different fingerings so you can see the benefits and disadvantages of each.
If you’re looking for other chords to learn, how about about the open D chord? Or you can search for other chords up top in the navigation bar.