Are you just getting started on guitar? Are you so new to it that you don’t know how to play any chords? Well we’re going to change all that today. In this lesson, I’m going to show you the guitar chord you should learn first: E minor. Spend some time learning the correct way to play this chord, and then practice a little bit each day; before you know it, you’ll be transformed from hopeless noob to an official guitar student, ready to devour more chords like a squirrel devours nuts.
Terminology
First of all, let’s talk for a minute about terminology. In music, when referring to a major or minor chord by its letter name, the chord is assumed to be major unless you add something after the letter. So, for example, if you say you’re playing a G chord, everyone knows you mean you’re playing a G major chord.
“G chord” = “G major chord” ![]()
If, on the other hand, you’re playing a minor chord, you have to say “minor” after the letter:
“E chord” ≠ “E minor chord” ![]() Nope!
Nope!
“E minor chord” = “E minor chord” ![]()
(This only applies to chords, not notes, because there is no such thing as a major or minor note.)
One other thing: In music notation, minor chords are abbreviated as “min.” or “m”. So all three of these are the same: E minor = E min. = Em
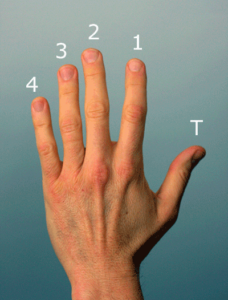
And finally, a reminder if you don’t already know: when referring to a guitar player’s left hand, we use the numbers 1, 2, 3, and 4 to refer to the index, middle, ring, and pinky fingers, respectively (and T for thumb). Like so:
Playing the E Minor Chord
The Em chord is a good one to start with because you only play two notes with your left hand. Also, for this chord, your right hand strums all six strings, so you don’t have to worry about accidentally playing a wrong string; just play ’em all.
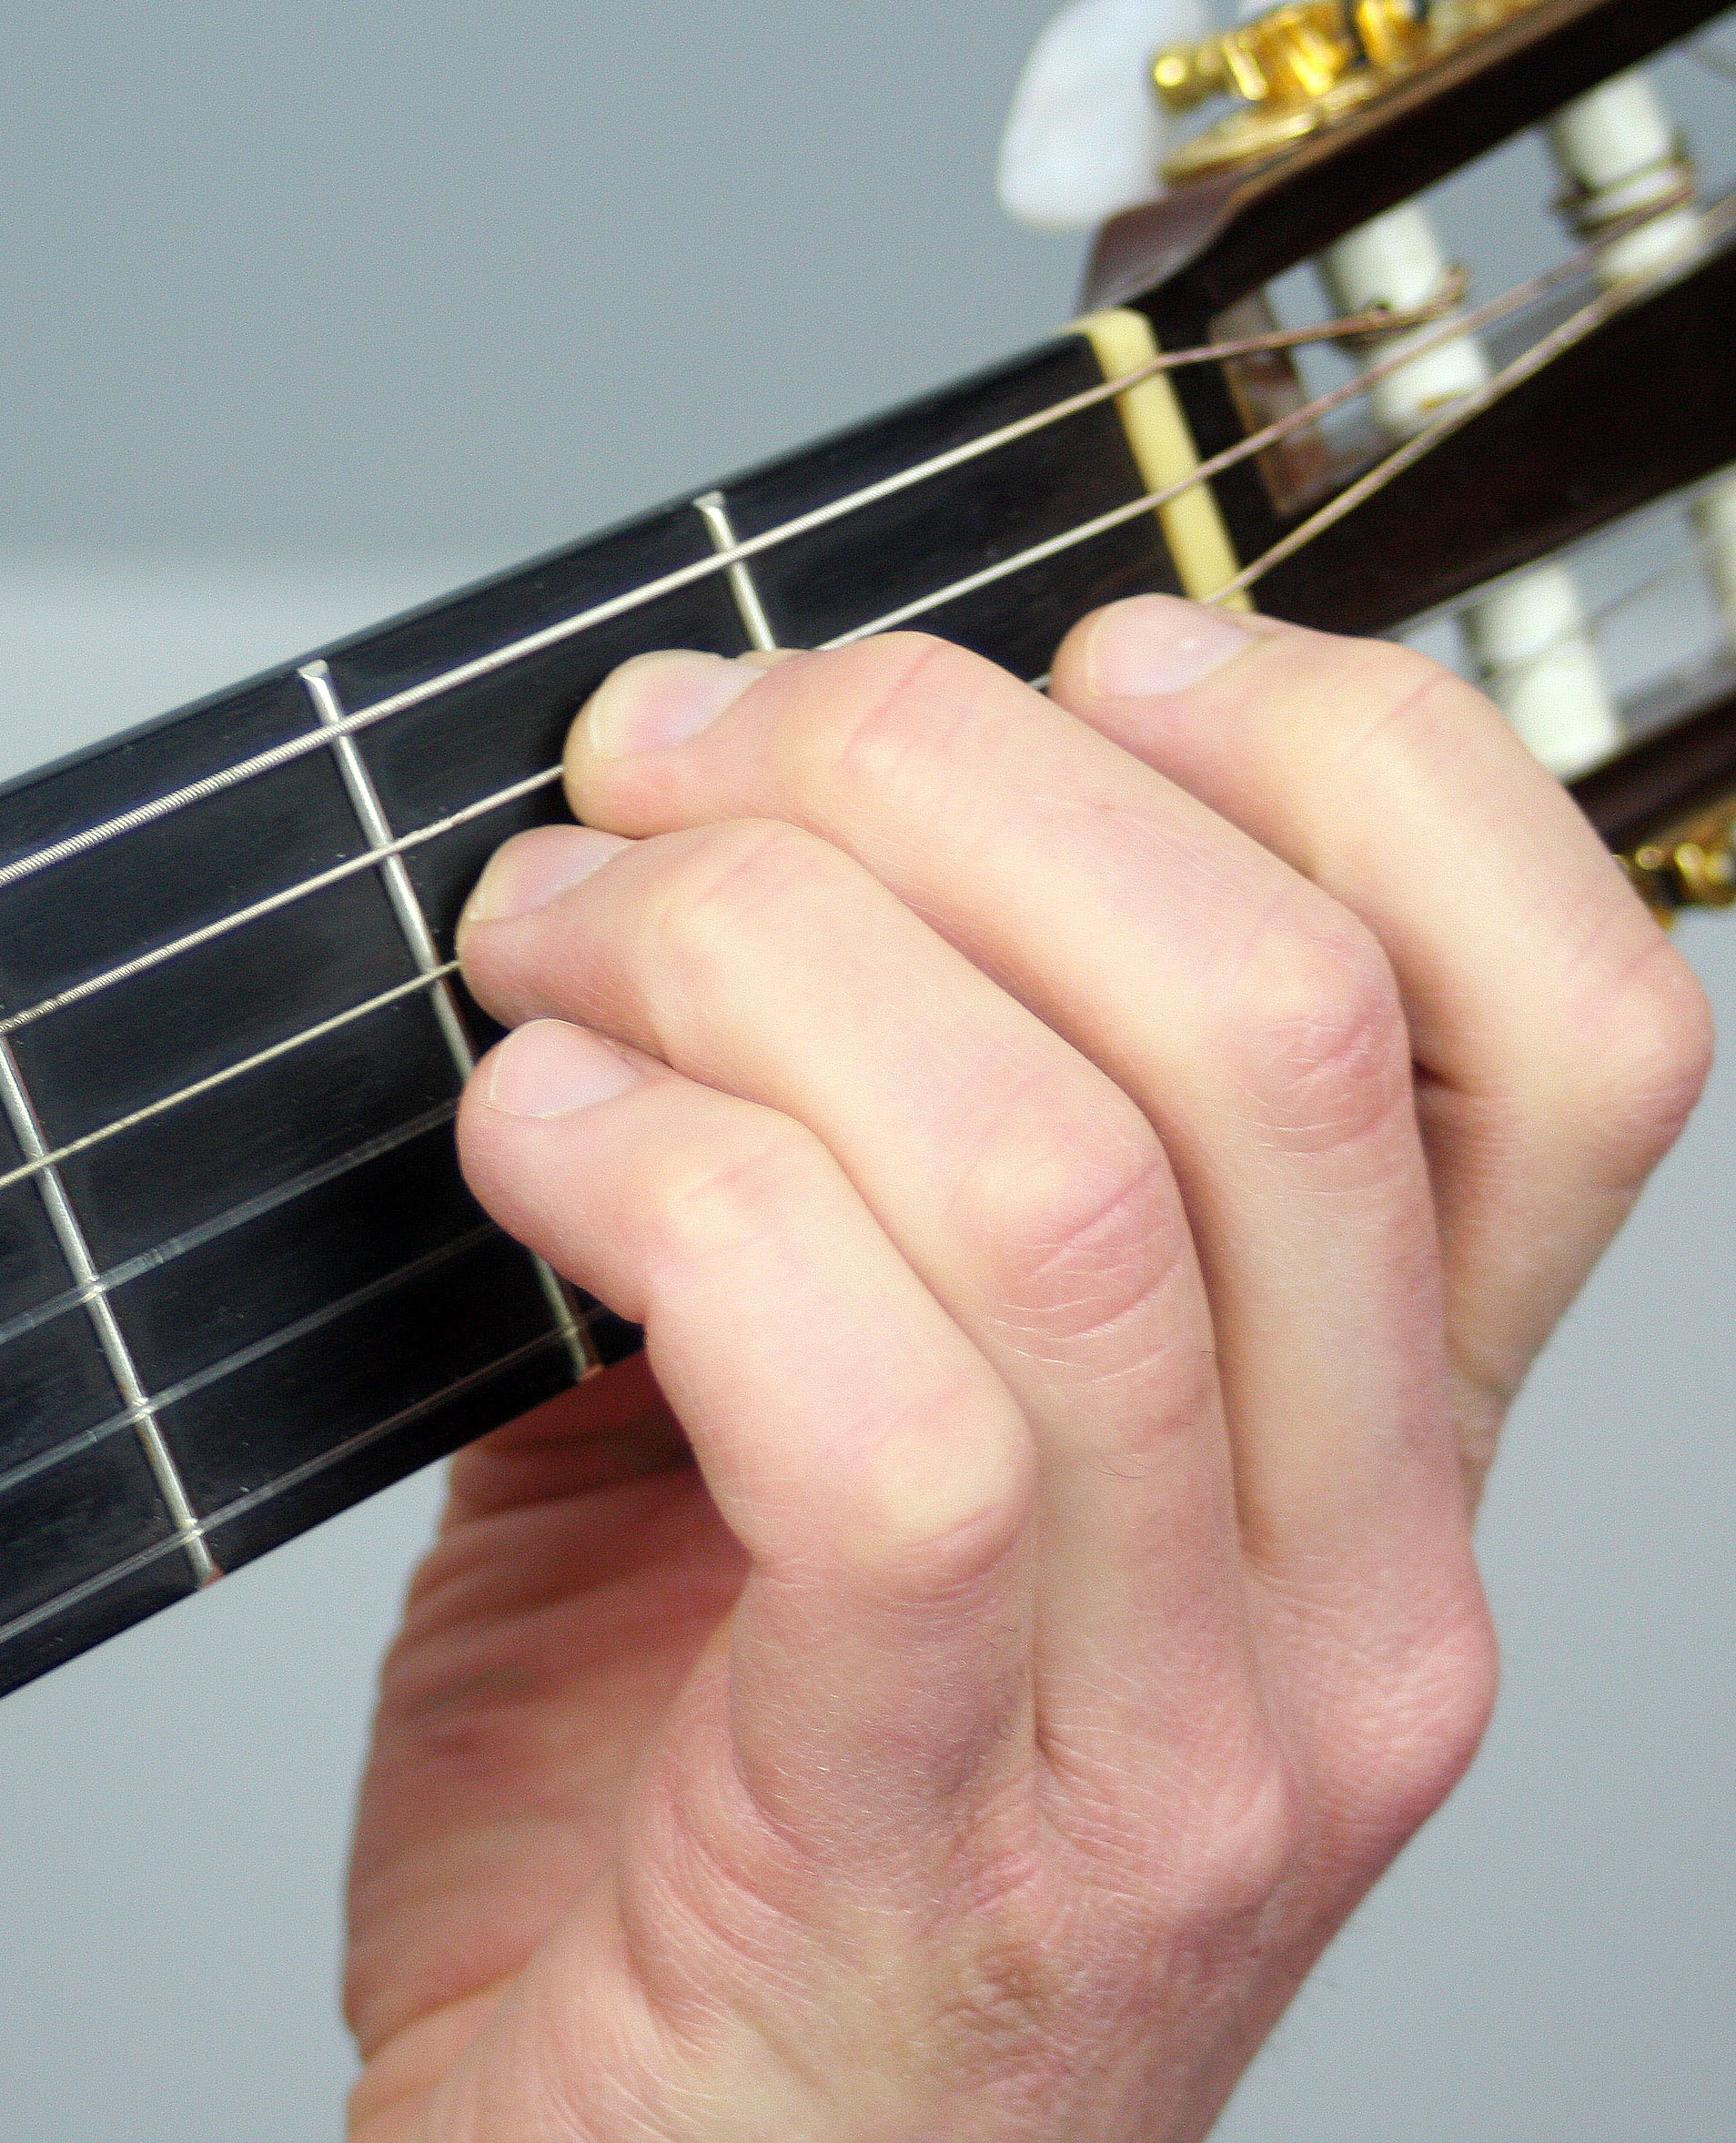
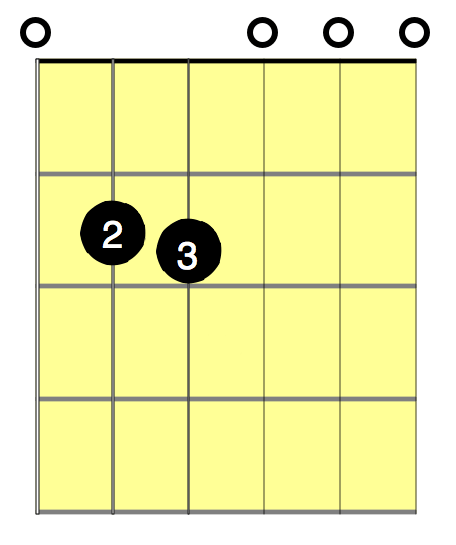
To finger the chord, place your 2nd (middle) finger on the 2nd fret of the A string and place your 3rd (ring) finger on the 2nd fret of the D string.

As with all chords, you should first make sure that your thumb is in the right position. You can check out the How to Hold the Guitar lesson for more details about left-hand placement (in fact, you should really read that whole lesson before you read this one) but here’s a quick summary: Keep your thumb behind the neck, and somewhat perpendicular to it, like this:

For the fingers of the left hand, keep the following in mind:
1. Play close to the fret
The fingers should be close to, but not on top of, the fret you’re playing (in this case, the 2nd fret). So, in other words, this diagram on the left:

…is played more like this:
Note how the fingers play close to the fret wire (but not on the fret!). Chord boxes are drawn like the one on the left but are actually played more like the one on the right. Also, note in the diagram on the right and in the picture above that, in this chord, the 2nd finger can’t get as close to the fret as the 3rd finger can because the 3rd finger is in the way. That’s fine—you just do the best you can. The further away from the fret you play, the more likely you are to get buzzing, and nobody wants that.
2. Play with the tips of your fingers
Contact the strings with the tips of your fingers. If your fingers flatten out too much when you play chords or single notes, they’ll probably hit other strings that you don’t want them to hit. So always try to play with the tips of your fingers (unless you’re intentionally flattening your finger, like for a barre chord). In this diagram, the circle represents the string, as if you were looking at it from the side. Notice that the very tip of the finger makes contact with the string–not too close to the nail, and not too far the other way either.

Your fingers should generally have a natural curve and come straight down onto the fretboard. Avoid unnecessary tension. Note the difference between the following photos. In the left photo, the fingers are relaxed and curve naturally with a minimum of tension, with the tips pressing down straight onto the fretboard. In the right photo, the fingers are coming in at a sharper angle and the 3rd finger is touching the G string and muting it. In this chord, that string should be ringing out as an open string. Playing with the tips of your fingers will help you automatically get the right finger angles and ensure that you don’t mute other strings or make them buzz.


3. Press down just hard enough
Anytime you play a note or a chord, you should press down on the string just hard enough to make a clear sound, and no harder. Once you’re fingering the note solidly, pressing down any harder is just wasted energy and will make your hand get tired more quickly. If you pay attention to this when you start playing chords, you’ll eventually find the right balance. It’s a good idea to experiment with playing notes with different pressures to see how much is enough and how much is too much.
Practice!
You can progress quickly with learning chords if you go through a quick little checklist each time you practice a new chord after first learning it. It takes a little bit of extra effort but avoiding bad habits now will make a huge difference later on.
- As you’re putting your fingers onto the strings, remember to play with the tips of your fingers and a relaxed hand.
- Strum the chord a few times and see if it sounds good. If it’s buzzing or it just doesn’t sound right somehow, check your fingering.
- Play each note in the chord, one string at a time. For each note, make sure it sounds clear without any buzzing or other weirdness. A buzzing or muffled/muted string is usually caused by one of the following: (a) You’re not pressing the string down hard enough, (b) another finger is accidentally touching the string you’re trying to play, or (c) you’re not fingering the note close to the fret.
- When each individual note is ringing out clearly, then strum the chord a bit and listen to how amazing you are. Then take your hand off the fretboard and try the whole thing again from the beginning.
Do this every now and then for newly learned chords and you’ll see a lot of progress. Over time, you’ll be able to finger the chord correctly the first time, without any buzzing or having to adjust your hand.
Chord Switching
As soon as you’re able to play the Em chord reasonably well, you should practice switching between chords. Once you can switch between chords, playing the guitar gets a lot more fun. Now, I realize you might only know one chord so far, so what you’re going to do for now is switch between (1) playing the Em chord for four beats and then (2) taking your hand off the fretboard for four beats. If you know another chord, then play that one instead of removing your hand.
To be clear, by “switching between chords,” I mean switching between them at a steady pace. In other words, you want to practice switching from one chord to the other without slowing down the tempo.
To practice chord switching, do this:
- Start off by tapping your foot and counting (internally or out loud) “1, 2, 3, 4”, and keep repeating it. Start at a very slow pace, and keep it nice and steady. If you have a metronome (and you should get one if you don’t), I strongly suggest setting it at a nice slow tempo and tapping your foot along with it.
- Strum the Em chord, once per count (so, four times).
- Take your hand away from the fretboard and stop strumming but continue counting—four more times.
- Without slowing down your count, put your hand back on the guitar neck and strum the Em chord for four beats.
Repeat this over and over again, keeping in mind that the key to the exercise is to try to finger the chord quickly so that you don’t slow down the rhythm. So you need to go as slow as necessary—it doesn’t matter how slow. Everyone wants to go too fast when they start out, and when you go too fast, you’re going to slow down when you change chords. This is what you want to avoid in this exercise. Keep it slow! I don’t care how ridiculously slow you have to go. You want to force yourself to keep a steady rhythm.
Once you can switch chords at a slow but steady tempo and the chords sound good without any buzzing, increase the pace of counting and try getting smooth switching at that speed. When that speed is mastered, increase the tempo again, and so on.
That’s it for E minor. When you feel like you’re getting it down pretty well and are ready to learn a new chord, I suggest you move on to learning the G chord next. If you already know that one, check out other lessons on this site for more chords.