In this lesson, the second part of my series on music theory fundamentals, you’ll learn about the very important topic of intervals and how to apply them to your guitar playing. Intervals are key to understanding basic concepts like chords and scales, so if you want to up your chord/scale game, you’re in the right place.
Throughout this lesson, I’ll be using terms that I defined and explained in Part 1 of this series, The Chromatic Scale. So go check out that lesson first if you haven’t already.
First, some basic terminology. A musical interval is the distance between two pitches. (Technically, a pitch is the sound you hear, whereas a note is how you write down that pitch. But for the purposes of this lesson, we can use pitch and note interchangeably.)
When the two notes in an interval are played separately, it’s called a melodic interval. If the lower note is played first, it’s called an ascending melodic interval, and if the higher note is played first, it’s called a descending melodic interval. And finally, if we play the two notes together, it’s called a harmonic interval.
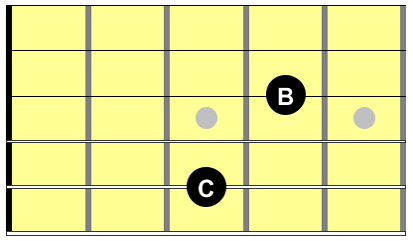
Here’s an interval called a perfect 4th (I’ll explain this below) shown three different ways:
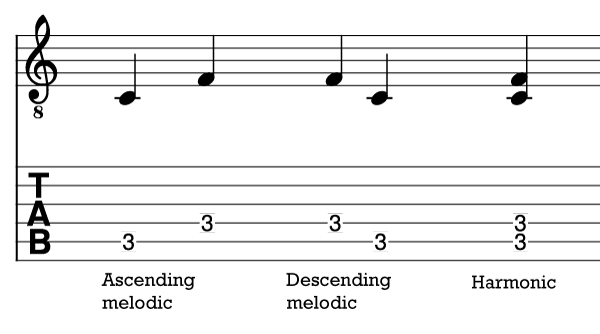
In this example, the notes are C and F. If you play the C first, and then the F, that’s an ascending melodic interval. On the other hand, if you play the F first, and then the C, that’s a descending melodic interval. And if you play them both together, that’s a harmonic interval. Regardless of how you play it, the interval is the same: a perfect 4th.
The main takeaway here is that it’s the distance between the notes that defines what the interval is, not the order in which the notes are played.
Interval Names
This distance between notes is measured using semitones, defined in Part 1 of this series. So the first step in understanding intervals is just learning what names are used for the different distances between notes. This is just straight-up memorization and there’s really nothing tricky about it.
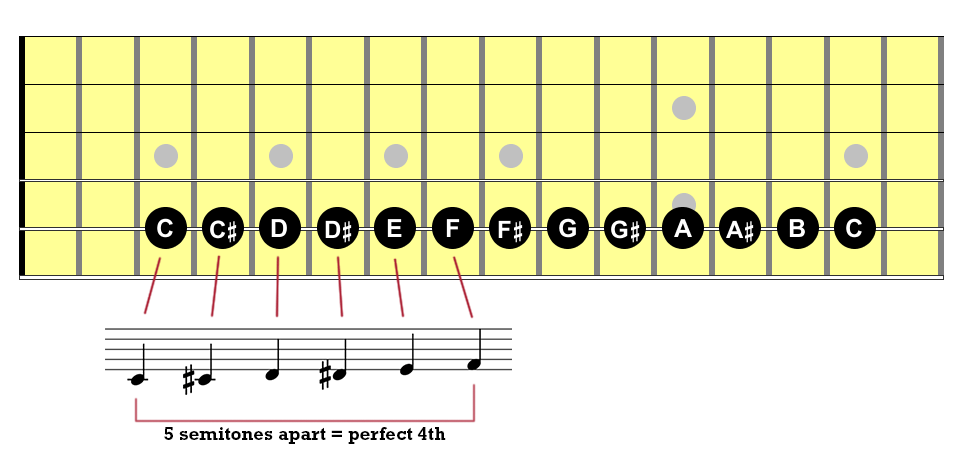
For example, the perfect 4th interval that I showed above is defined as a distance of five semitones between two notes. So if we start with C and count five semitones up, we get to F. On the guitar, one semitone = one fret, so that means counting five frets up, like so:
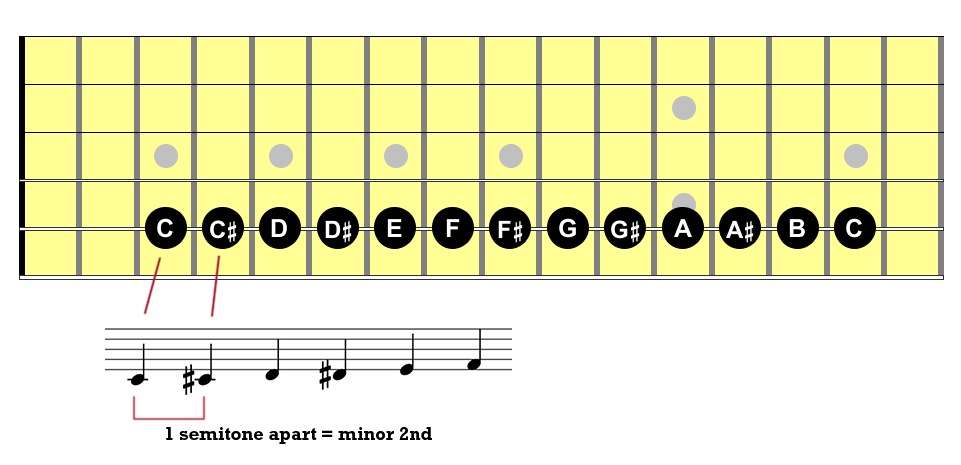
Another example: a distance of one semitone between two notes is called a minor 2nd. If you start with C and then you play one semitone (that is, one fret) higher, which is C# (or Db), you just played a minor 2nd interval:
With this in mind, let’s look at the names of all the different intervals within an octave. The following table lists the interval names and their distances in semitones.
The table also shows an example of each interval on guitar. Keep in mind that, for each interval, just one of many possible examples is shown, since you can play an interval on one string, across multiple strings, etc. But I tried to pick common patterns that you’ll encounter frequently and that you’ll eventually visualize when you think of particular intervals. Also, remember that notes can have more than one name, so C# is the same as Db, G# is the same as Ab, and so on.
The last column contains a button that you can click to hear what the interval sounds like. These example are all harmonic intervals, i.e., the notes are played at the same time.
Table of Interval Names
Interval Name
Unison
Distance
0 semitones
On Guitar

Sound
Interval Name
Minor 2nd
Distance
1 semitone
On Guitar

Interval Name
Interval Name
Major 2nd
Distance
2 semitones
On Guitar

Interval Name
Interval Name
Minor 3rd
Distance
3 semitones
On Guitar
Interval Name
Interval Name
Major 3rd
Distance
4 semitones
On Guitar

Interval Name
Interval Name
Perfect 4th
Distance
5 semitones
On Guitar

Interval Name
Interval Name
Tritone
Distance
6 semitones
On Guitar

Interval Name
Interval Name
Perfect 5th
Distance
7 semitones
On Guitar

Interval Name
Interval Name
Minor 6th
Distance
8 semitones
On Guitar

Interval Name
Interval Name
Major 6th
Distance
9 semitones
On Guitar

Interval Name
Interval Name
Minor 7th
Distance
10 semitones
On Guitar

Interval Name
Interval Name
Major 7th
Distance
11 semitones
On Guitar
Interval Name
Interval Name
Octave
Distance
12 semitones
On Guitar

Interval Name
Keep in mind that these intervals are the same no matter what note you start on. I’m just illustrating everything here starting on C to keep things simple, but you can start on any note, count up the specified number of semitones, and you’ll still have the same interval. For example:
If you start on A and then play C# (4 semitones higher), then you’ve played a major 3rd.
If you start on G and then play F# (11 semitones higher), you’ve just played a major 7th. And so on.
Perfect, Augmented, and Diminished Intervals
As you can see from the list of interval names above, 2nds, 3rds, 6ths, and 7ths can all be classified as being either minor or major, depending on the distance between the notes. Whereas 4ths and 5ths (and actually, octaves and unisons too, although I haven’t indicated that here) are called perfect. There are historical reasons that I won’t get into now for why the word “perfect” is used but a simplified way of thinking of it is that perfect basically means “not major or minor.”
In addition to the basic interval names listed above, you’ll sometimes run into augmented and diminished intervals. An augmented interval is a major or perfect interval that is raised by one semitone. Conversely, a diminished interval is a minor or perfect interval that is lowered by one semitone.
So, for example, if you take our old friend C – F (a perfect 4th) and raise the F by one semitone, you get an augmented 4th: C – F#. Or if you take C – G (a perfect 5th) and lower the G by one semitone, you get a diminished 5th: C – Gb. Both of these intervals are exactly the same (in terms of what you hear) as the tritone described above. But when it comes to doing something like analyzing a score, the different names matter. For our purposes now, we don’t need to worry about it. (See the related note below in the Technical Definition of Intervals section.)
Augmented and diminished intervals and chords appear frequently in jazz but are much less common in most rock and popular music.
In the meantime, if you have any questions about anything in this lesson and need some more explanation, leave a comment below. Other than that, keep practicing, and I’ll see you in the next one.
The intervals shown above all occur within the span of one octave and are called simple intervals. But intervals can also extend beyond one octave, resulting in so-called compound intervals. For any given simple interval, there is a compound interval whose distance is equal to the simple interval + one octave.
Compound Intervals
For example, a distance of 2 semitones—say, from A to B—gives us the simple interval major 2nd. But if we take that same A and then play the B one octave higher, we get the compound interval called a major 9th. This winds up being 14 semitones: the octave (12 semitones) plus the major 2nd (2 semitones).
Compound intervals are common in jazz chords and are used to add color to more basic 7th chords. The most common compound intervals are the 9th (one octave + 2nd), the 11th (one octave + 4th), and the 13th (one octave + 6th). These can be major or minor, just like the simple intervals.
Two Clarifications
This notion of “distance in semitones” is useful in defining the intervals because it can easily tell you what interval you’re dealing with. But I want to clarify two points: First, you probably won’t really think of intervals in terms of their “distances” and, second, this definition using semitone distance alone isn’t technically complete.
Thinking About Intervals
The first point, and this is actually a good thing, is that you usually won’t think of intervals in terms of their distance in semitones when you play. Let me explain…
Even though, for any given interval, we can say it is two notes that are x semitones apart, there are other ways of arriving at intervals that are more intuitive and natural when you’re actually playing.
Here’s an example: let’s say you’re soloing in a major key, or just noodling around, and you want to play a major 7th. There’s a very good chance that you won’t be thinking “hmm, I’ll just play 11 semitones higher than the root note”. Instead, you’ll probably think “oh, a major 7th is one fret lower than the octave”. Remembering that simple relationship to the root note is a lot easier than memorizing an arbitrary number of semitones. And when you look at the guitar fingerboard, it’s much easier to visualize too.
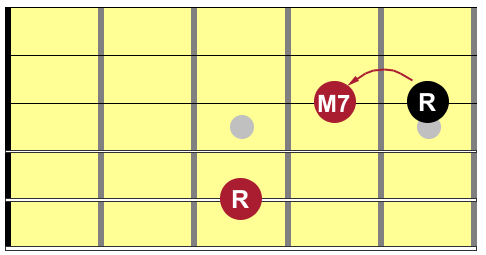
It’s pretty easy to think of a major 7th as one fret below the root note

But counting up 11 semitones while you’re playing is not really practical
This is just one example but the point is that, as you learn the intervals, you’ll recognize patterns and you’ll come up with your own visual landmarks that will help you find the interval you need. You don’t need to prioritize memorizing the distance between the notes for each interval (although that certainly can’t hurt).
The Technical Definition of Intervals
The second thing I want to quickly note is that the more precise definition of intervals is more complicated than what I’m describing in this lesson. To a musicologist, the proper naming of an interval requires not only the distance in semitones between the two notes but also involves the spelling of the two notes. And this spelling (letter names, such as D, Bb, G#, etc.) relates to the notes’ positions on the musical staff.
This more technical view can get complicated and can result in some weird interval names like a doubly augmented 4th or a triply diminished fifth. Understanding how this can happen goes way beyond the scope of this lesson and that’s why I’m not going into it. But I promise you, you don’t need to worry about it now, if ever. In fact, you can go through decades of playing and never once need to know weird interval names like this, unless you decide to delve into advanced music theory. I just wanted to point out that, like with so many things, there are additional layers of complexity below the surface.
The Sounds of the Intervals
So now we’ve looked at the definitions and names of the various intervals. A valid follow-up question is “So what?” That is, why do we care whether this one is a major 3rd, that one is a minor 6th, and so on?
One important answer is that each interval has a characteristic sound, and it is these particular sounds, and the way that we combine them, that gives us chords, scales, and harmony. Delving into the particular sounds of each interval would take too long for this introductory lesson, but I do want to discuss one important concept related to the way intervals sound: consonance and dissonance.
Consonance and Dissonance
One fundamental property of all musical sounds that are played together is their relative degree of consonance or dissonance. Consonant intervals generally sound stable and at rest. Dissonant intervals sound unstable and tense. Ideas about which intervals are consonant or dissonant are subjective and have changed over the centuries, as musical tastes have changed. But these days most people break it down this way:
Consonant Intervals
- Minor 3rd
- Major 3rd
- Perfect 4th
- Perfect 5th
- Minor 6th
- Major 6th
- Octave
Dissonant Intervals
- Minor 2nd
- Major 2nd
- Tritone
- Minor 7th
- Major 7th
The musical context in which an interval appears also has a lot to do with whether we perceive it as being consonant or dissonant. But the above list is generally how we interpret intervals.
To illustrate the difference between consonant and dissonant intervals, let’s compare a minor 2nd to a perfect fifth.
The minor 2nd is a very dissonant interval and is characterized by a sense of tension. Click the button to the right to hear this interval and ask yourself whether this evokes a feeling of being at rest:
I’m guessing you agree that this doesn’t feel like we’re in a stable place and, as listeners, we expect this tension to be resolved somehow.
Now compare this with the perfect 5th interval, considered to be a consonant interval. Click the button to the right and ask yourself the same question:
Without any musical context to place this in, we don’t necessarily have a sense of resolution, but it should be apparent that this feels a lot more stable than the minor 2nd. The listener doesn’t feel a strong need for this interval to move somewhere to relieve the tension. It already feels pretty much “at rest”.
This example is just meant to give you a sense of the general concept of consonance vs. dissonance. But in the context of an actual piece of music, this interplay between consonance and dissonance happens constantly, in all kinds of different shades and intensities. And this is a big part of what makes music interesting and amazing. Good chord progressions build and release tension in endless and fascinating ways. But that’s a topic for another lesson.
Inverting Intervals
A common practice when playing an interval or chord is to play an inversion. An inversion is a chord or interval whose notes are arranged in a different order. To create an inversion of an interval means to move the higher note down an octave or move the lower note up an octave.
For example, take the interval C – G, which is a perfect 5th:
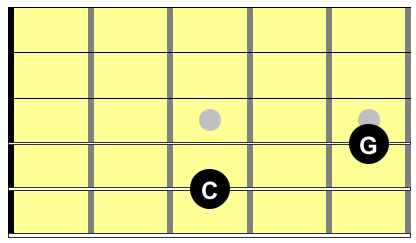
If we take the lower note, C, and move it up an octave, we get G – C. This is a perfect 4th because the distance from G to C is 5 semitones (G, G#, A, A#, B, C) and 5 semitones = perfect 4th.
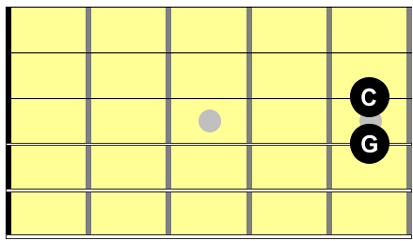
The inverted version of an interval is said to be the complement of the original interval. In this case, we see that a perfect 4th is the complement of a perfect 5th.
Let’s look at another example:
The interval from C to A is a major 6th, as we already know from the table of interval names above:

This time, let’s lower the A an octave, which gives us A to C. Counting from A to C involves 3 semitones (A, A#, B, C), which means the complement of the original major 6th is a minor 3rd (because a minor 3rd = 3 semitones).

To figure out the inversion of any interval, you can always flip the interval upside down and count the steps in the resulting inverted interval. But it turns out that there are some handy rules that make it easier to remember how intervals are related to their inversions:
Rules for Inverting Intervals
- 2nds invert to 7ths
- 3rds invert to 6ths
- 4ths invert to 5ths
- Major inverts to minor
- Perfect stays perfect
- Tritone stays tritone
- Octaves and unisons stay the same
To clarify, the rules work in both directions, so minor inverts to major, 7ths invert to 2nds, and so on. Using these rules, we can find out the inversions without having to actually flip the notes and count.
For example, to invert a minor 2nd, the applicable rules are “minor inverts to major” and “2nds invert to 7ths”. So a minor 2nd inverts to a major 7th:
Original Interval
Minor 2nd
Inversion (Complement)

Major 7th
Or, to take another example, to invert a major 3rd, the applicable rules are “major inverts to minor” and “3rds invert to 6ths”. So a major 3rd inverts to a minor 6th:
Original Interval

Major 3rd
Inversion (Complement)

Minor 6th
Practice
Having a solid understanding of intervals is an important prerequisite for learning about chords and scales and how they relate to each other. So any time spent studying and practicing intervals now is a good investment in your further musical knowledge. Here are some suggestions for how you might approach practicing intervals on the guitar:
- Play all of the simple intervals shown in the Table of Interval Names earlier in the lesson. First, starting on C, play each interval as shown in the corresponding diagram. Pay attention to the patterns as shown, as you’ll encounter these over and over again once you’ve learned to recognize them.
- Next, still starting on C, find different ways to play each interval: all on one string, using other strings, playing them in different octaves. You’ll notice that the patterns shown in the lesson need to be changed when the B string is involved (since that string is tuned differently from the other strings).
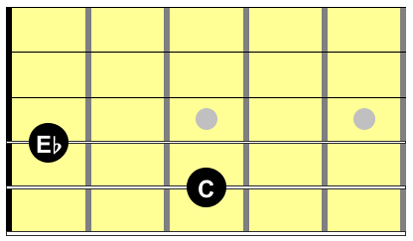
- Pick a different starting note and play all the intervals starting with that note instead of C. Say the names of the notes in each interval that you play. So, for example, maybe you’ll decide to start with A. When you play the major 3rd, say “major 3rd: A, C#”. When you play the tritone, say “Tritone: A, Eb” or “Tritone: A, D#”. Do this with a bunch of different starting notes.
- Randomly play two notes that are in the same general area on the neck and then try to figure out what interval you’ve played.
- Listen to the sound of each interval that you play. Start to get a feel for the relative consonance or dissonance of the intervals. Play the intervals both melodically (one note at a time) and harmonically (both notes together). Try to recognize the characteristic sound each interval has, so that eventually you’ll be able to tell what interval is being played just by listening to it. For most people, it will take time and lots of practice to get to this point, but it’s an important skill to develop. I’ll talk about this more in a future lesson on ear training. There are a ton of free ear-training apps available on the web or on mobile, and these can be really helpful in learning to identify intervals by ear. The best one I’ve found so far is called Functional Ear Trainer. (I don’t have any connection to whoever made this app, but I recommend it highly.)
Next Steps
Well that wraps up Part 2 of the Music Theory Fundamentals series. If you understand most of the stuff in this lesson and the previous chromatic scale lesson, you’re well positioned to move on to the next lessons, which will cover scales and chords. That’s where things start to get interesting.