For most people, the major scale is the most familiar musical scale. Many of us learned it when we were young as “do – re – mi – fa – sol – la – ti – do.” To understand concepts like chords, major and minor keys, modes, and more, it’s important to understand how the major scale works. In this lesson, Part 3 of my series on music theory fundamentals, I’ll explain what the major scale is and why it’s important.
If you’ve read Part 1 and Part 2 of this series, you already know that the chromatic scale gives us the twelve notes that we have available to use in most Western music:

C chromatic scale using sharps
The image above uses only sharps for the “in-between” notes, but the same exact scale can be represented using flats instead:

C chromatic scale using flats
Here are all the notes of the chromatic scale in a row. We’re starting on C to keep things simple, but we could start on any note.

When notes have two names, like C# and Db, we can use either name, depending on the context. (Notes like this are called enharmonic.)
You might also remember that each note in the chromatic scale is one half step (or one semitone) away from the note next to it:

Other types of scales can be formed by grouping together sequences of notes from the chromatic scale, according to different patterns. For example, one such pattern gives us the major scale, which we can define as follows:
The major scale is a sequence of notes that is made by starting on any note and moving up using the pattern W – W – H – W – W – W – H, where W is “whole step” and H is “half step”.

Step pattern for the major scale
Now we have a definition for the major scale. So let’s look at what we get if we apply that pattern to the C chromatic scale.
Creating the C Major Scale
First, we’re going to start on the note C. (The starting note of a scale is called the root note.) Looking at the pattern, we see that we first have to move up a whole step. One whole step = two half steps, so if we go up two half steps, we get to D:

Let’s replace the labels for those two half steps to show that we moved up one whole step. This is the first W in our W – W – H – W – W – W – H pattern:

Next up, we have the second W in the pattern, so we move up a whole step from D. This brings us to E.

The next step in the pattern is a half step. Moving a half step up from E brings us to F. (Remember, there is no E# or Fb.)

So far, we’ve done the first three steps in the pattern, which is whole – whole – half (W – W – H).
So let’s finish the scale by adding in the remaining four steps, which are whole – whole – whole – half (W – W – W – H):

We’re done with the pattern, so now we have the C major scale. Let’s get rid of the extra stuff we don’t need so we can see what’s left:
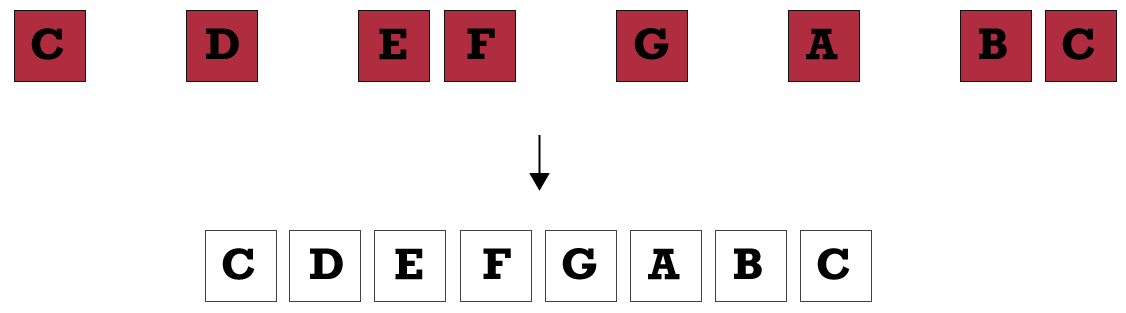
C major scale
This is the C major scale that we know and love. But we can just as easily figure out the major scale in any other key. All we have to do is start on a different note of the chromatic scale and apply the pattern of W – W – H – W – W – W – H.
Let’s look at one example to illustrate this.
Creating the Major Scale in Any Key
For this example, we can pick any other note of the chromatic scale as the starting point. In this case, I’ll pick A.
If we rewrite the chromatic scale so that it goes from A to A, instead of from C to C, it looks like this:

A chromatic scale
Note that, even though we’re starting and ending on different notes, the notes of the scale are exactly the same.
So, following the same process we followed to create the C major scale, we can go ahead and apply the major scale pattern of W – W – H – W – W – W – H to this scale. If we do that, we wind up with this:

Major scale pattern applied to A chromatic scale
Now if we clean up the unnecessary stuff we don’t need, we wind up with the A major scale. Note that the A major scale uses sharps, not flats, so we can drop the flat names entirely:

A major scale
Now that we’ve looked at how to make the major scale in a couple of different keys, we should quickly look at some terminology.
Scale Degrees
The position of each step in a scale is called a degree. And each degree in the major scale has a specific name that you should be familiar with. Some of these terms you won’t hear used too often but some—like tonic, subdominant, and dominant—are particularly important. I’ve also included the interval that is formed between the scale degree and the root note (or tonic) in a major scale.
| Scale Degree | Name | Distance (Interval) From Root |
|---|---|---|
| 1 | Tonic | Unison |
| 2 | Supertonic | Major 2nd |
| 3 | Mediant | Major 3rd |
| 4 | Subdominant | Perfect 4th |
| 5 | Dominant | Perfect 5th |
| 6 | Submediant | Major 6th |
| 7 | Leading Tone | Major 7th |
| 8 | Tonic | Octave |
Playing the Major Scale on Guitar
Now that we know how to create the major scale, let’s see what it looks like on the guitar.
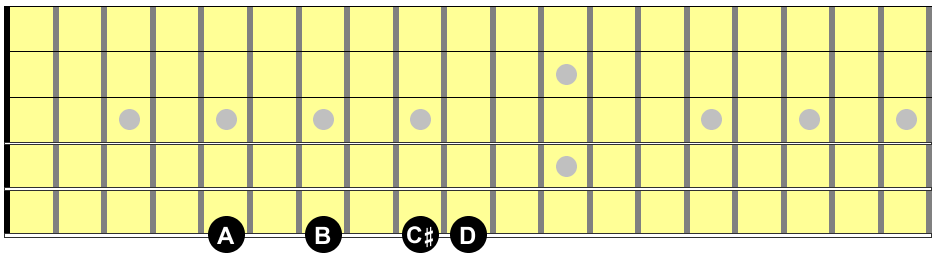
As I mentioned above, you can pick any starting note and apply the W – W – H – W – W – W – H pattern, and you’ll get a major scale. On the guitar, the distance of a half step is one fret and a whole step is two frets. So let’s pick a note and apply the pattern. We’ll start with the A on the 5th fret of the low E string as our root note:

By now, we know that the first step of the pattern is a whole step, which means we have to move up two frets to B:

The next step is also a whole step, so we move up another two frets to C#:

The next step is a half step, so we move up just one fret to D:
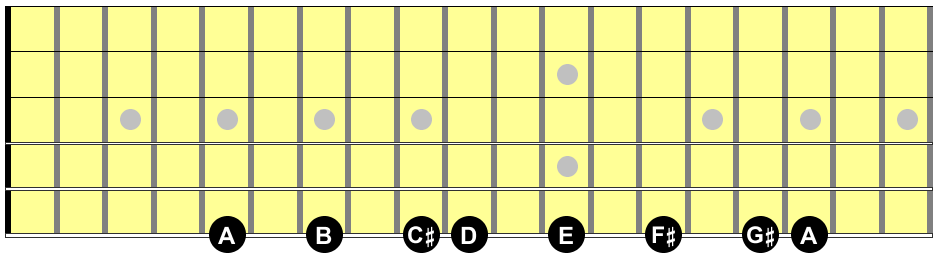
So far, we’ve done the first three steps of the pattern: W – W – H. To save time, let’s just add the remaining four steps (W – W – W – H) in one shot, like we did earlier. This gives us the completed A major scale on one string:
This one-string pattern will work anywhere on the guitar, on any string. Pick any root note, and play that pattern on the same string, and you’ll have yourself a major scale.
Now this is very useful to know but, most of the time, you won’t be playing the scale up and down one string. You’d have to move your hand back and forth an awful lot to do that. Instead, you’ll usually play scales across multiple strings. So let’s look at that next.
The Major Scale Across All Six Strings: Pattern 1
The following pattern is one of the most important major scale patterns, and it allows you to play the scale in two octaves, across all six strings. It doesn’t really have a name, so I’m just going to arbitrarily call it “Pattern 1”.
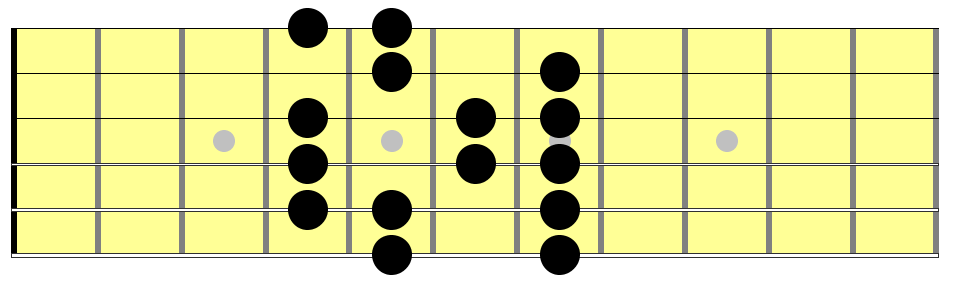
Two-octave major scale pattern (“Pattern 1”)
The diagram above just shows you the pattern itself, because you should (eventually) commit it to memory and have it burned into your brain (and fingertips). But let’s look at the same pattern in a couple of different ways to help explain it.
First, we can add the letter names to the pattern. Since this scale, like our earlier example, starts on the A on the 5th fret of the low E string, this is an A major scale. So the notes should be familiar from above. In this example, the root notes appear in red to make it easy to distinguish them:

A major scale with note names
This is a movable pattern. So you can start it on any fret on the low E string, and you’ll wind up playing the major scale for whatever note you started on. For example, if you start it on the 3rd fret, you’ll play a G major scale. If you start it on the 9th fret, you’ll play a C# major scale.
Next, we can look at the fingering of Pattern 1. As you can see from the following diagram, the root note in Pattern 1 is played by your 2nd (middle) finger. The next note, B, is played by your 4th (pinky) finger. The next note, C#, is played by your 1st finger on the 5th string. And so on…

Pattern 1 with fingering
This lesson is focused on music theory, so I’m not going to go any further into how to play the major scale on the guitar; this pattern and others are covered in detail in another lesson. But you should memorize Pattern 1 and practice playing the scale both ascending and descending across all six strings (see the Practice section below).
Getting back to the theory side of things, it’s worth talking about why the major scale is so important to learn and understand.
Why the Major Scale is Important
The major scale is kind of a tricky beast when it comes to understanding music theory. On the one hand, it’s a pretty simple concept: just pick a starting note and apply the W – W – H – W – W – W – H pattern, and you’ve got it. But on the other hand, it’s the foundation of a lot of harmonic theory, so there is a lot of depth below the surface.
Fortunately, to understand and apply this scale to guitar playing, we don’t need to get into a study of advanced harmony. But there are a few key concepts that are essential to guitar playing and that depend on a knowledge of the major scale. Some of these key concepts, which are covered in detail in other lessons, are:
- Diatonic chords: The chords that belong to a particular key are called diatonic chords. Each of the diatonic chords in a major key is built off of the notes in the major scale of that key. So first you need to know that major scale, and then you can learn the triads (three-note chords) and four-note chords that are built off of each step of the major scale. This is covered in my lesson on triads.
- Modes: So far, we’ve looked at the major scale starting and ending on the first note of the scale. But we can play the same notes, starting and ending on different notes of the scale. Doing this with all seven notes of the major scale gives us the seven modes of the major scale. For example, if you play the C major scale but, instead of going from C to C, you go from D to D, you’ve just played the D Dorian mode. Learning the modes is super helpful in helping you decide which scale to play over which chords.
- Keys: To understand what it means to play in a particular key, we need to know what the notes are in that key. For any major key, the notes of that key are the notes of the major scale. And minor keys are related to major keys, as will be explained in a future lesson in this series.
Practice
Hopefully by now you have a better understanding of the major scale than when you started this lesson. To help solidify the ideas in your mind, I recommend you spend some time studying and practicing this scale. Here are some suggestions:
- In this lesson, we constructed two different major scales: C major and A major. Using the same method, construct the major scale starting on other notes. Check Wikipedia or other websites to see if you got the right notes. (Tip: Use sharps when constructing scales for G, D, A, E, B, F#, and C#, and use flats for F, Bb, Eb, Ab, Db, and Gb.)
- Practice playing the scale on one string. Maybe start with the A major scale, since the diagram for that is shown in this lesson. Experiment with different fingering patterns to minimize the number of times you have to change position. Then try the pattern on a different starting note, on a different string. Do this in various places on the fretboard.
- Learn the scale starting with an open string and play that on one string. For example, start with the E major scale on the 1st (or 6th) string and play it up to the 12th fret and back down. Again, try to minimize the times you have to switch positions with your hand.
- Pick a note on the low E string and play Pattern 1. First play just the first octave, from the 6th string to the 4th string and back down again. This “box” pattern is important as it can be moved to anywhere on the 6th or 5th strings to play a one-octave major scale. So try to commit it to memory.
- Move on to the full two-octave version of Pattern 1. Play the entire scale ascending and descending so that you wind up back on the first note on the low E string. Practice alternate picking as you do this; this is a great exercise to do every day to warm up your hand and to internalize the pattern of the major scale.
- When practicing any version of the scales described in steps 2 – 5, practice them in different ways. Meaning, sometimes go very slowly and say each note out loud as you play it (like “F, G, A, Bb,…”) Other times, as you get more comfortable with the patterns, play them more quickly and just focus on the feeling and hand position. (But don’t ever play so quickly that you get sloppy; always have good technique and gradually increase speed.)
The overall goal of this practice is to make the major scale a familiar and comfortable pattern in both your head and your hands. This won’t all come overnight, but it will come with frequent practice, even for a little bit at a time.
Having this familiarity with the major scale will set you up nicely for understanding how chords are constructed and how they’re related to scales. These topics are covered in lessons on triads and modes, the next installments coming up in this series on music theory fundamentals. Until then, happy practicing.
Great lesson thank you.
I definitely have better understanding of the major scale.
Cheers
Right on! Glad it was helpful.
Great info that was explained in a concise way that was easy for a beginner like me to understand. I’m definitely gonna check out your other lessons. Thanks!
Thanks–I appreciate the feedback!