The open C chord is one of the most important guitar chords to learn for a beginning player. For one thing, it’s used in many songs, especially acoustic songs. But it’s also important as a foundation for learning about other guitar topics and music theory. As you might know, C major is the only major scale that has no sharps and no flats. This makes it a good choice for explaining basic musical concepts like scales, intervals, and triads.
However, even though it’s an important chord, it’s not ideal to learn as your first chord. Although C major is usually the first chord learned on piano, the C chord on guitar is not the easiest to play for a beginner. The hand position takes a little getting used to and can be a bit frustrating at first. As a result, I think E minor is a better chord to start out with. In fact, before moving on with the C chord below, I suggest you check out the lesson on how to play E minor. That lesson includes important information about thumb and finger position that applies to all chords.
C Chord Finger Position
The fingering for the C major chord on guitar is shown below. As you can see, you need to play three notes on the fretboard: the 1st finger on the 1st fret of the B string; the 2nd finger on the 2nd fret of the D string; and the 3rd finger on the 3rd fret of the A string.
In this version of the open C chord, the right hand plays five of the six strings; the low E string is not played. This presents a challenge, discussed below.

Making it Sound Good
A couple of things make the C chord a bit tricky to play cleanly:
- It’s easy to accidentally touch other strings with your fretting fingers.
- The low E string often gets played accidentally by your right hand.
Let’s look at each of these in turn:
C Chord Challenge 1: Left Hand Accuracy
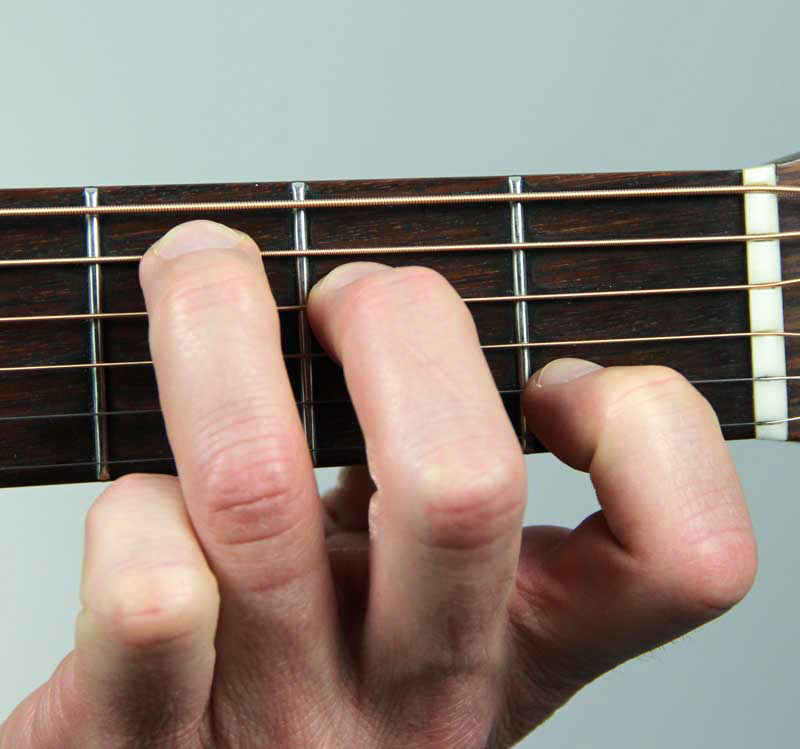
Beginners often play the C chord with their fingers at a shallow angle. The two pictures below illustrate what I mean. On the left, you can see that the fingers are meeting the fretboard at a shallow angle. As a result, the 3rd finger is touching the D string and muting it.
In contrast, on the right, the fingertips come down onto the fretboard at a steeper angle. This prevents the fingers from touching other neighboring strings. Notice how, unlike the left picture, the 3rd finger stays clear of the D string. This allows the note played by the 2nd finger on that string to ring out fully and not create buzzing.

Finger angle too shallow
Playing with tip of 3rd finger
So, as with most chords, there are two keys to playing all the notes cleanly. First, play with the tips, not the pads, of your fingers. And second, make sure your fingers are hitting the fretboard at a steep, not shallow, angle. The last joint of each finger should be pretty close to vertical when it touches the string.
C Chord Challenge 2: Avoiding the Low E String
As I mentioned above, the low E string can present a problem when playing a C chord on guitar: unless you’re careful, it’s easy to play the open E along with the chord. Now, to be clear, the E is not technically a “wrong” note. In fact, E is one of the three notes in a C major chord: C – E – G. However, when playing a chord, you usually want the root note of the chord (in this case, the note C) to be the bass note, or lowest note in the chord.
You can easily check this yourself by playing the C chord and making sure you also play the low E string with it. You’ll probably notice that the chord has a certain “color” to it that is different from when you manage to keep the low E string quiet.
So the challenge is: how exactly do you keep that low E string quiet? Well, there are several different ways, and I think these are the three most important:
Don’t touch the low E string with your right hand
This is the most obvious and basic solution; if you don’t hit the string with your right hand, it’s not going to make a sound. But this is easier said than done when you’re a beginner because it takes a while to develop right-hand control and accuracy. Still, it’s something you should always be working on, with this chord and any other chord you play: try to only pick or strum the strings that you intend to play.
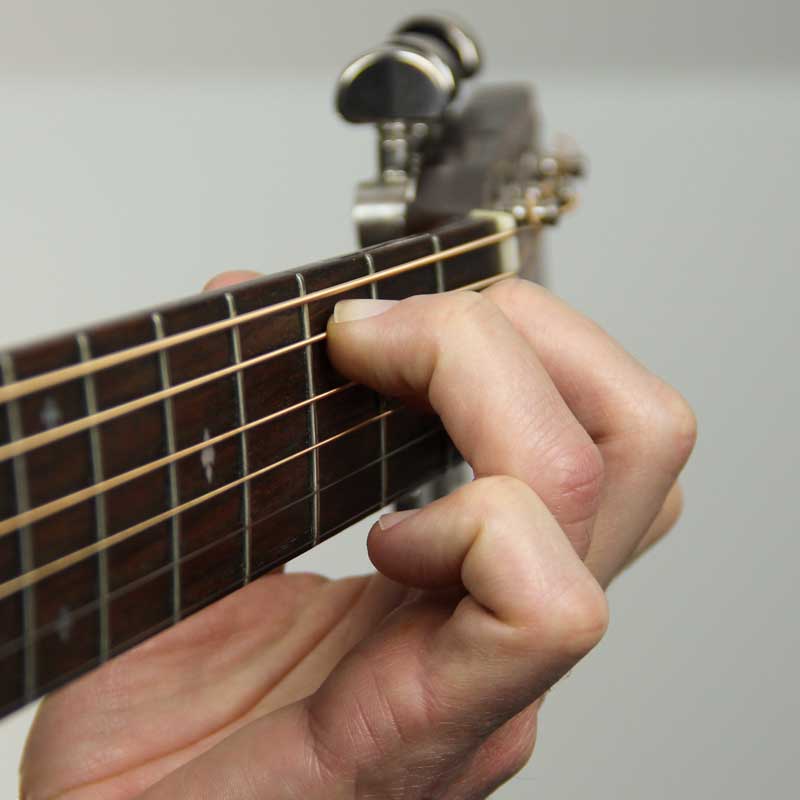
Mute the low E string with the edge of your 3rd (ring) finger
This is more subtle and can be done in combination with the above. The idea is that you place your 3rd finger so that, while it’s playing the 3rd fret on the A string, it’s also touching the low E string and muting it. This looks like this:

Now, you have to be careful when you do this. If you just touch the E string lightly, you might cause it to buzz instead of muting it. So you need to make sure your finger is touching it solidly enough that it completely deadens the string. This will come with practice.
Getting this to work correctly will also require modifying the suggestion I made above about the angle of the fingertip where it hits the fretboard. You might need to flatten the third finger out a bit or otherwise adjust how you play that note. Notice how, in this photo, the third finger is at a little bit of a flatter angle than the other two fingers. However, it’s still not touching any other strings, so that’s fine. Just experiment and see what works.
Mute the low E string with your thumb
This involves wrapping your thumb around the neck so that it reaches over to touch the low E string and mute it. As I often say, you don’t want to get in the habit of always wrapping your thumb around the neck when you’re learning, because you need to be able to play with your thumb behind the neck too. But there are times when it’s very handy (no pun intended!), and this is one of the times. This is the method I most often use when I’m playing a C chord.
Here we can see that the thumb is wrapped around the top of the neck and is touching the low E string. This completely deadens it and allows the right hand to strum away with abandon, without being too concerned about which strings it hits.
One other thing to note is that there is still some space between the bottom of the neck and the palm of the hand. That is, the hand is not completely gripping the neck like a baseball bat. You want to try to make sure you still maintain this space whenever possible. So, when wrapping your thumb around, start with your thumb in the recommended position behind the neck. Then wrap it around just far enough and no farther, so that you can still maintain some space between your hand and the fretboard.

Practice!
As always, the key to playing a new chord well is to practice it regularly. You don’t have to go crazy with it and practice until your hand aches. In fact, that’s not a good idea at all. I suggest you experiment with these different ways of playing the C chord in short bursts, for just a few minutes at a time. Within a week or two, you’ll make a huge amount of progress and you’ll have a new chord in your bag of tricks. If you want a nice easy song to use when practicing this chord, check out the lesson on how to play Knockin’ on Heaven’s Door.